TVC Basebot User Manual
1. Manual Description
This user guide explains how to set up and start operating your TVC Basebot and provides examples of simple missions you can expand to your purposes. This guide also contains information regarding the external and internal components of the TVC Basebot along with instructions for proper maintenance of the robot. You will also find information regarding the safety and specifications needed to commission a safe TVC Basebot application.
NOTICE: Save this manual. It contains important safety and operating instructions.
1.1. Applicable Readers
This manual is applicable to:
- Customer engineers
- Installation and commissioning engineers
- Technical support engineers
1.2. Description of Copyright Reserved
Techvico Co., Ltd. owns the patent right, copyright and other intellectual property rights of the product and its software. Without written authorization of the Company, no unit or individual shall extract or copy the contents of this document without permission; and the product and its related parts shall not be directly or indirectly copied, manufactured, processed, or used. This manual and related contents are only used to provide product usage information for the final customer, and Techvico Co., Ltd. reserves the right to change or revoke the contents at any time.
This manual is the proprietary information of Techvico Co., Ltd., and is protected by the copyright law of the Socialist Republic of Vietnam.
1.3. Disclaimer for This Manual
The contents of this product manual (hereinafter referred to as "manual") are subject to change without prior notice. The company and personal data used in the examples in this manual are fictitious unless specifically stated. The use of this manual and any products referred to in this manual is restricted by the user license agreement employed. With the strong specialization for the use and maintenance of this product, any unit or individual shall not be allowed to repair or dismantle the product without training and authorization from Techvico Co., Ltd. This document does not serve as a guide for maintenance and detection and shall be only used as an instruction document. The equipment in operation is dangerous! So, the user shall be responsible for establishing effective safety protection mechanisms during the operation of the equipment, and Techvico Co., Ltd. shall have no obligation and responsibility for the incidental or consequential losses caused thereby. Techvico Co., Ltd. does not assume any direct, indirect, special and incidental losses and liabilities caused by the incorrect use of this product.
1.4. Version History
TVC Basebot Revision: 1.0 Release date: 2024-07-02 Description: First edition
2. Product Presentation
2.1. Introduction
Industries across the globe are grappling with increasing pressure to enhance efficiency, streamline operations, and remain competitive in today's fast-paced markets. Traditional manual methods of material handling, inventory management, and logistics are proving insufficient in meeting the growing demands for speed, accuracy, and scalability.
According to recent statistics, the demand for automation solutions, including AMRs, has seen a significant uptick in recent years. This trend is driven by a variety of factors, including labor shortages, rising labor costs, and the need for greater operational agility in response to market fluctuations.
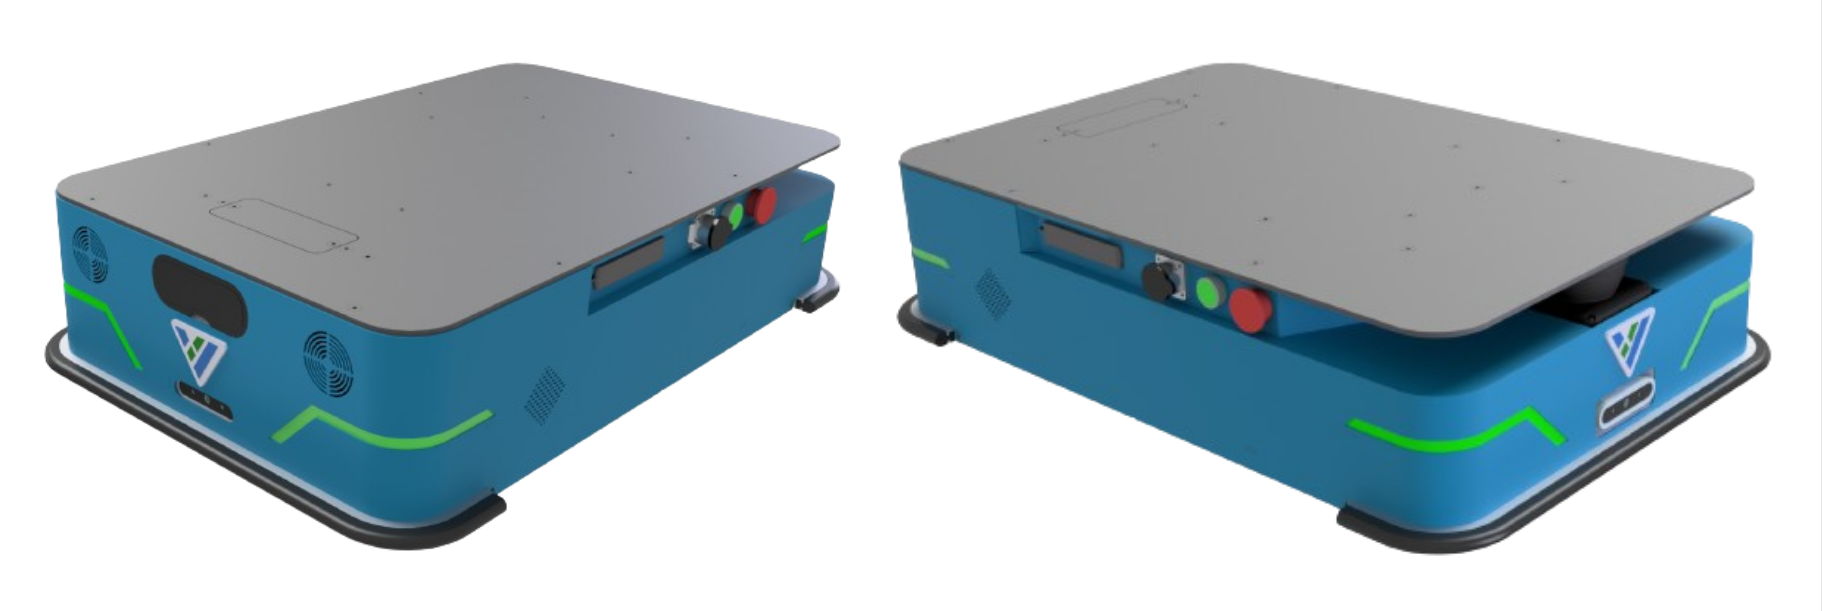
TVC Basebot is the ultimate Autonomous Mobile Robot (AMR) platform that offers unparalleled versatility and adaptability to meet the diverse needs of your business. Built on a robust foundation of cutting-edge technology and modular design, TVC Basebot empowers you to customize your automation solution by selecting the top module that best suits your specific requirements.
TVC Basebot’s modular architecture allows customers to easily attach different top modules to customize functionality according to their needs, such as a robotic arm for material handling, a camera system for inspection and surveillance, or a payload platform for transporting goods, TVC Basebot can be adapted to accommodate your chosen application seamlessly.
2.2. Main Features
Compact design with Omnidirectional drives
Basebot is able to operate swiftly in confined spaces and navigate safely to its destination with omnidirectional drives, which offer the required flexibility.
Fast Swap Battery Design
Basebot supports automatic charging, manual charging and quick battery replacement, and it can return to the work site in a short time to ensure 24-hour continuous operation and quick response.
Safety Sensors With Light & Voice alert
Equipped with the laser scanner and other sensors, Basebot can detect and identify obstacles intelligently, and avoid them actively. It will also notify humans in the environment by emitting a light and voice alert to signal its movement.
Compatible with top modules to use for different purposes
The TVC Basebot is designed to combine with different top modules such as conveyor, shelf, robot arm, etc. to serve each customer's specific purpose. Contact Techvico's technical team for advice on top modules suitable for this product.
2.3. Product Composition
This section presents the parts of TVC Basebot that are visible on the outside.
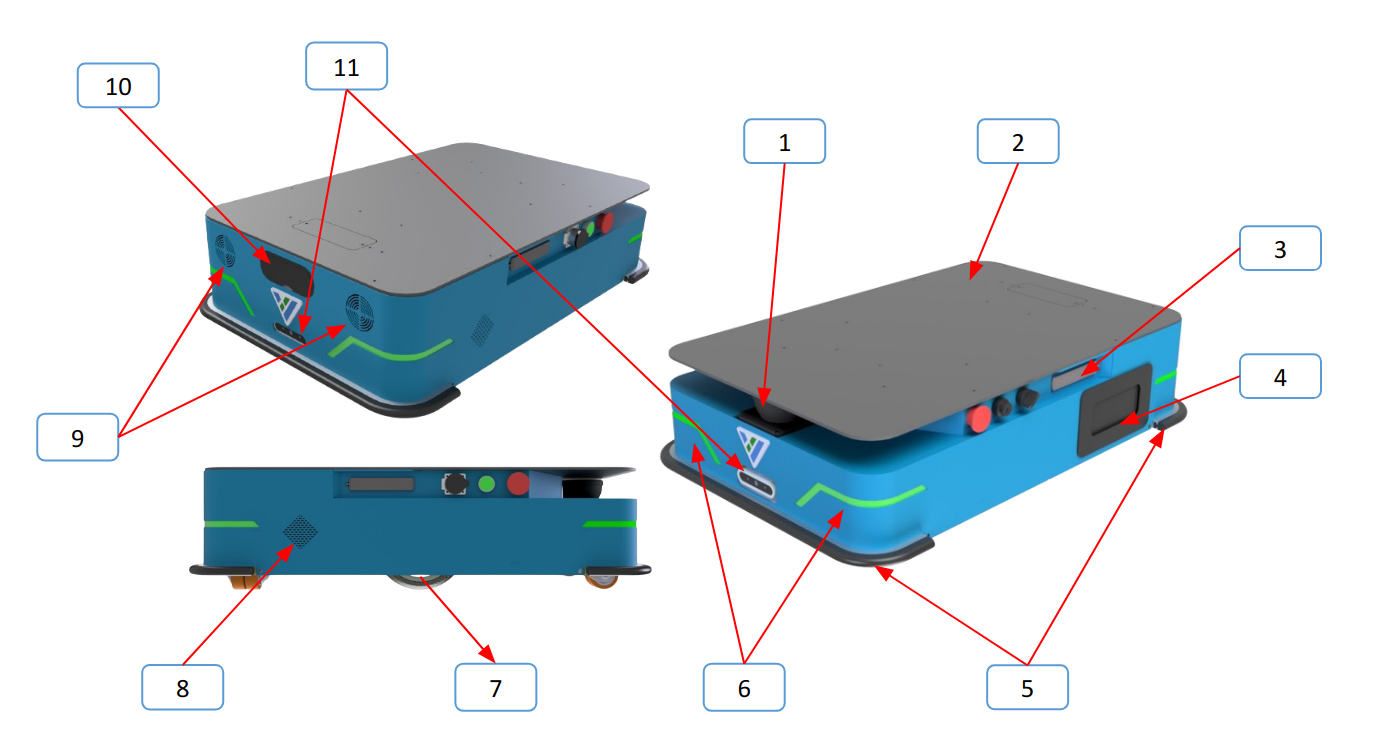
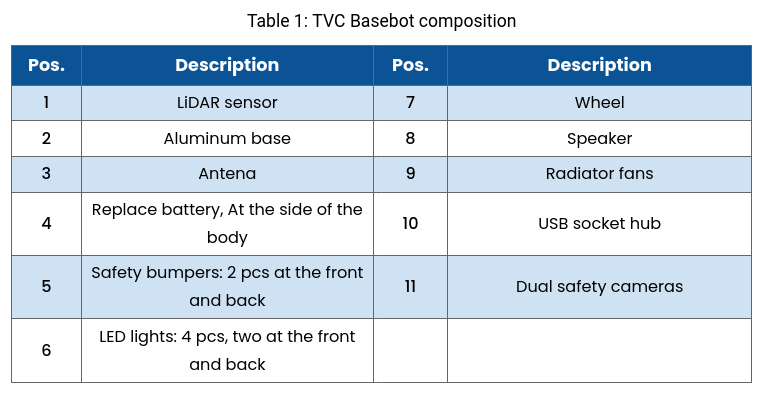
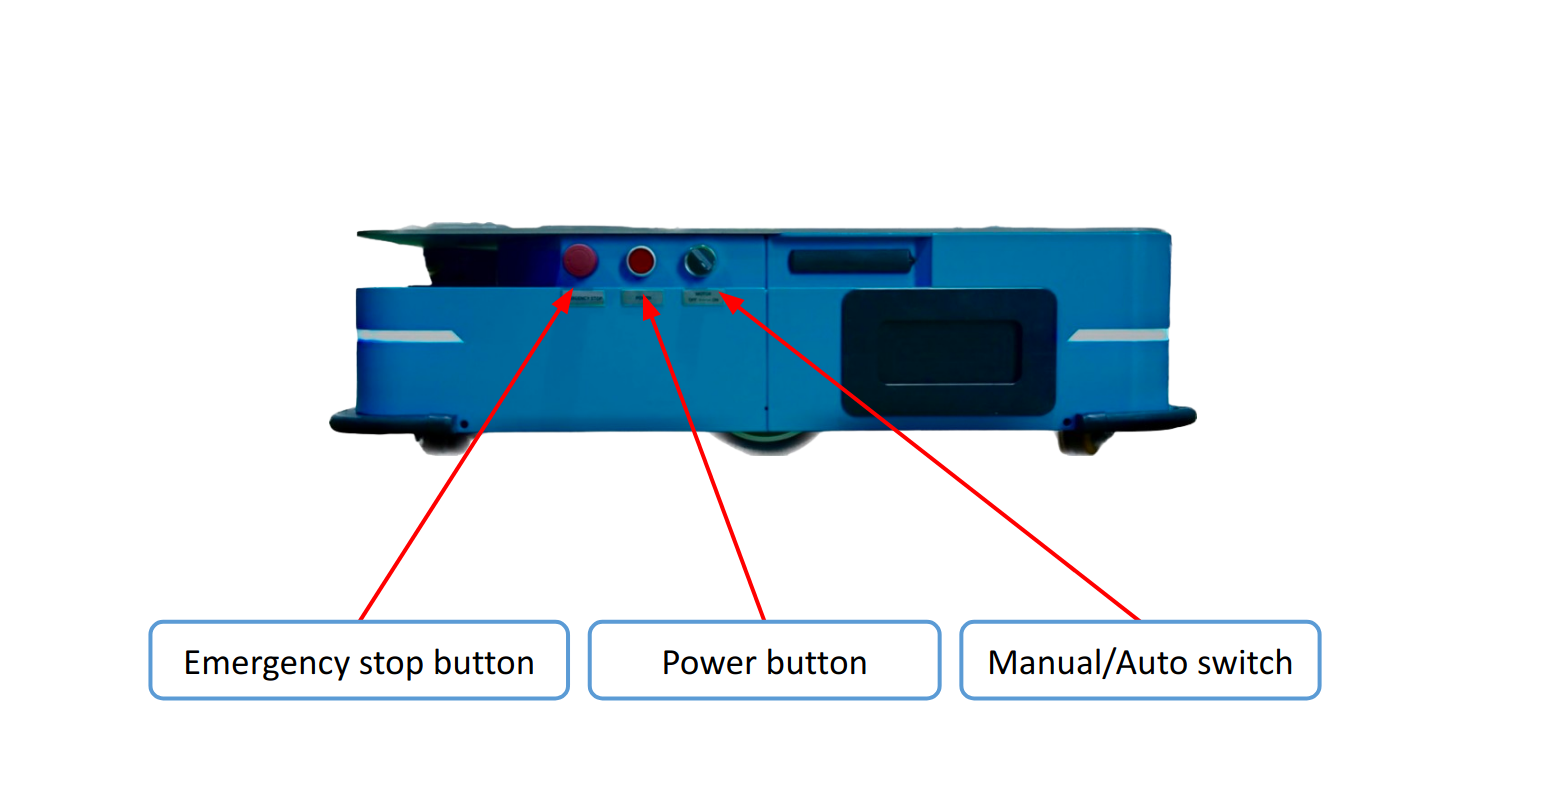
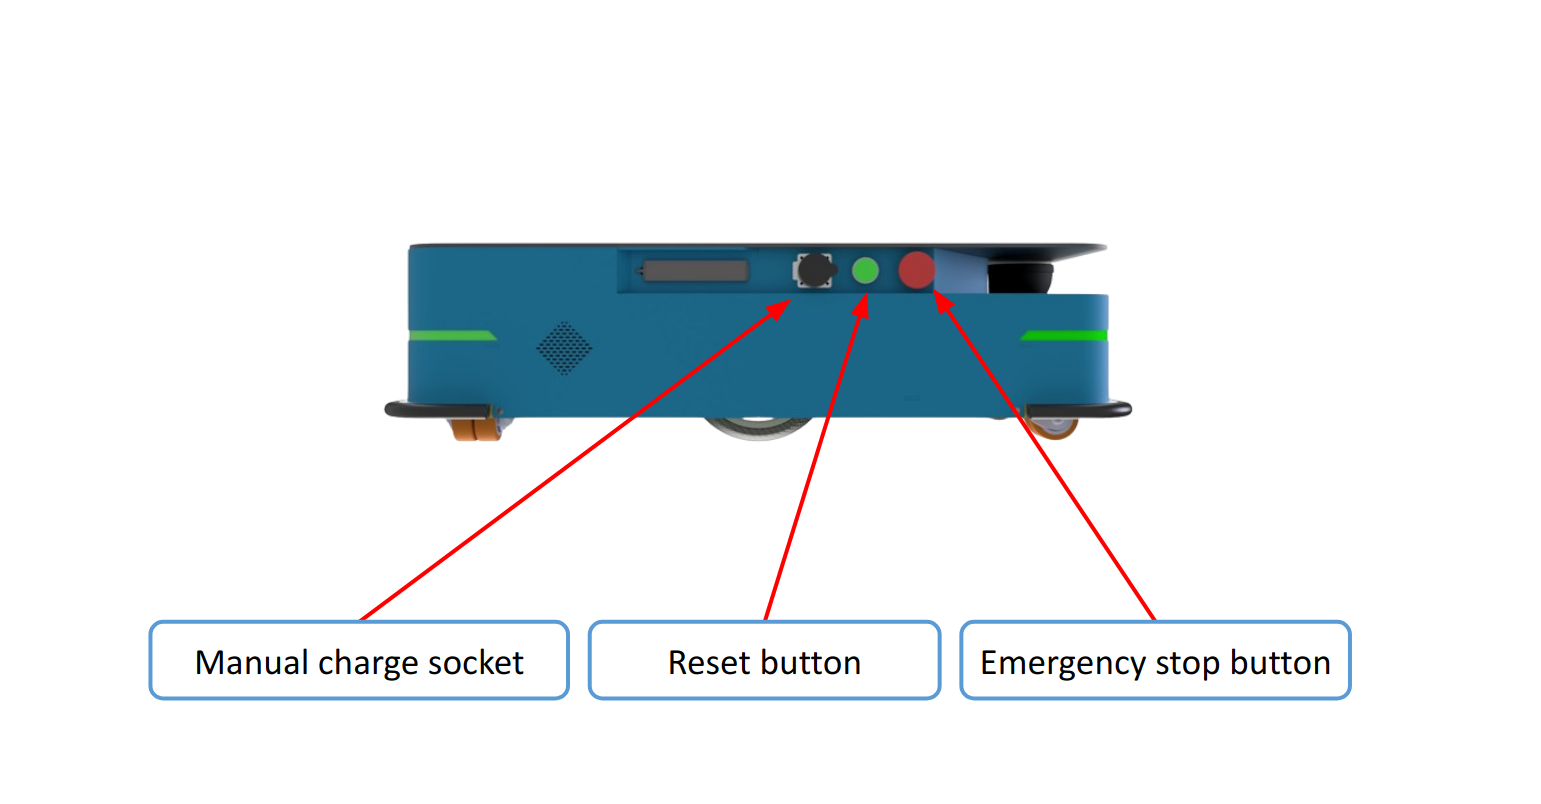
Button panel: TVC Basebot has 2 button panels on two sides of the body.
- Power button: Users press and hold the power button for 2-3 seconds to turn the robot on or shut it off.
- Emergency stop button: Stop the robot when pressing
- Manual/Auto switch: Turn this switch to change between Auto and Manual mode
- Manual charge socket: for manual charging
- Reset button: Press this button to clear the Emergency or Protective stop state.
3. Safety Warnings
Any improper operation may cause damage to the machine, and in serious cases, it may cause loss of people and property, so please read the manual carefully before operating the robot.
3.1. Safety Message Types
This document uses the following safety message types.
WARNING Indicates a potentially hazardous situation that could result in death or serious injury. Carefully read the message that follows to prevent death or serious injury.
CAUTION Indicates a potentially hazardous situation that could result in minor or moderate injury. Alerts against unsafe practices. Carefully read the message that follows to prevent minor or moderate injury.
NOTICE Indicates important information, including situations that can result in damage to equipment or property.
3.2. General Safety Precautions
This section contains general safety precautions.
WARNING If the robot is not running the correct software and is therefore not functioning properly, the robot may collide with personnel or equipment causing injury or damage.
- Ensure that the robot is always running the correct software.
WARNING The robot may drive over the feet of personnel, causing injury.
- All personnel must be informed of the side Protective fields of the robot and be instructed to wear safety shoes near an operating robot
WARNING The robot may drive into a ladder, scaffold, or similar equipment that has a person standing on it. Personnel risk fall injuries and equipment may be damaged.
- Don't place ladders, scaffolds, or similar equipment in the robot's work environment.
WARNING The robot may drive down staircases or holes in the floor and cause serious injury to personnel and damage to the robot and to equipment.
- Keep the maps up to date.
- Inform personnel that the robot cannot detect descending staircases and holes in the floor in time to stop.
WARNING Contact with live electrical parts can cause electric shock.
- Do not touch any internal components of the robot while it is powered.
WARNING Using a charging device different from the one supplied by the manufacturer can cause a fire and thereby burn injuries to nearby personnel and damage to the robot and equipment.
- Only use the charger that is provided or suggested by Techvico.
WARNING Attempting to charge batteries outside the robot can lead to electrical shock or burns.
- Never charge the batteries outside the robot.
WARNING Lithium battery packs may get hot, explode, or ignite and cause serious injury if they are misused electrically or mechanically. Observe the following precautions when handling and using lithium-ion batteries:
- Do not short-circuit, recharge, or connect with false polarity.
- Do not expose it to temperatures beyond the specified temperature range or incinerate the battery.
- Do not crush, puncture, or disassemble the battery. The battery contains safety and protection devices, which, if damaged, may cause the battery to generate heat, explode, or ignite.
- Do not allow the battery to get wet.
- In the event the battery leaks and the fluid gets into one’s eye, do not rub the eye. Rinse well with water, and immediately seek medical care. If left untreated, the battery fluid could cause damage to the eye.
- Use only an original charger (cable charger or charging station) and always follow the instructions from the battery manufacturer.
- Do not touch damaged batteries with bare hands. Only personnel using suitable Personal Protection Equipment (PPE) and tools should handle damaged batteries.
- Isolate the battery and keep clear if the following conditions are observed:
- The battery exhibits abnormally high temperatures.
- The battery emits abnormal odors.
- The battery changes colors.
- The battery case is deformed or otherwise differs from the normal electrical or mechanical condition.
- Modifications or manipulations of the battery may lead to considerable safety risks and are therefore prohibited.
- Do not use the battery for anything other than TVC Basebot.
WARNING Product falling or robot overturning if the product on the robot is not positioned or fastened correctly can cause fall injuries to nearby personnel or damage to equipment.
- Ensure that the product is positioned according to the specifications and is fastened correctly - see Section 5. Specifications and Parameters. It is the responsibility of the commissioner to determine correct and safe methods of loading shelves.
- Conduct a brake test while the robot is transporting a fully loaded shelf.
CAUTION Robot malfunctions can cause an electrical fire, causing damage and injury to equipment and personnel.
- Personnel operating near the robot must be informed on how to use an ABC fire extinguisher to put out an electrical fire should the robot malfunction and catch on fire.
CAUTION Risk of trapping or injury to personnel if robots malfunction.
- Personnel operating near the robot must be informed on how to engage the robot's Emergency stop function in emergency situations.
3.3. Intended Use
TVC Basebot is intended to be commissioned and used in indoor industrial environments and for industrial and scientific research purposes depending on the top module that it collaborates with. For details about the environmental conditions in which TVC Basebot should operate, see the specifications for TVC Basebot on the Techvico website.
TVC Basebot is intended to be commissioned according to the guidelines in the Commissioning and Usage Section. This is a prerequisite for the safe usage of TVC Basebot.
TVC Basebot is equipped with safety-related features that are purposely designed for collaborative operation where the robot operates together with people.
3.4. Users
TVC Basebot is only intended to be used by personnel who have received training in their required tasks.
There are three types of intended users for TVC Basebot: commissioners, operators, and direct users.
Commissioners
Commissioners have a thorough knowledge of all aspects of commissioning, safety, use, and maintenance of TVC Basebot and have the following main tasks:
- Commissioning of the product. This includes creating maps and restricting the user interface for other users and making brake tests with a full payload.
- Conducting the risk assessment.
- Determining the payload limit, weight distribution, safe fastening methods, safe loading and unloading of products on TVC Basebot, and ergonomic loading and unloading methods if relevant.
- Ensuring the safety of nearby personnel when the robot is accelerating, braking, and maneuvering.
Operators
Operators have a thorough knowledge of TVC Basebot and of the safety precautions presented in this user guide. Operators have the following main tasks:
- Servicing and maintaining TVC Basebot.
- Creating and changing missions and map features in the robot interface.
Direct users
Direct users are familiar with the safety precautions in this user guide and have the following main tasks:
- Assigning missions to TVC Basebot.
- Loading and unloading products to the shelf securely from a paused robot.
All other persons in the vicinity of TVC Basebot are considered indirect users and must know how to act when they are close to the robot.
3.5. Foreseeable Misuse
Any use of TVC Basebot deviating from the intended use is deemed as misuse. This includes, but is not limited to:
- Using the robot to transport people
- Using the robot on steep surface grades, such as ramps
- Making changes to the LiDAR configuration
- Driving the robot on cross-slopes
- Exceeding the total payload
- Positioning products incorrectly according to the specifications
- Using Emergency stop buttons for anything other than emergency stops
- Driving the robot with anything other than safely commissioned shelves
- Using the robot in medical and life-critical applications
- Operating the robot outside the permissible operating parameters and environmental specifications
- Using the robot in potentially explosive environments
- Using the robot outdoors
- Using the robot in hygiene zones
3.6. Residual Risks
Techvico has identified the following potential hazards that commissioners must inform personnel about and take all precautions to avoid when working with TVC Basebot:
-
You risk being run over, drawn in, trapped, or struck if you stand in the path of the robot or walk towards the robot or its intended path while it is in motion.
-
You risk being crushed or trapped if you touch the robot while it is in motion.
-
You risk being crushed or trapped if the robot places a product outside a designated drop-off area due to faulty localization.
-
You risk losing control of the robot if it is accessed by unauthorized users.
NOTICE Other significant hazards may be present in a specific robot installation and must be identified during commissioning.
4. Quick Use Instruction
This section describes how to get started with TVC Basebot.
NOTICE Read the Safety Warnings Section before powering up TVC Basebot.
4.1. Unboxing
After you open the shipping carton containing the product, take the following steps:
- Check for damage during shipment. Report damage immediately to the carrier who delivered the carton.
- Make sure the items in the carton match your order.
- Save the shipping container for later storage or shipping.
4.2. Powering up The Robot
To power up the robot, follow these steps:
- Press and hold the power button for 2-3 seconds until users can hear a “click” sound to turn the robot on.
- The status lights at the button panel are green, and the robot is now ready for operation.
4.3. Connecting to The Robot Interface
After turning on the robot and waiting for a while, users can access the TVC WebApp interface for creating maps, drawing markers, paths, and creating missions, follow these steps:
- Using your PC/laptop, connect to the WiFi access point of the robot using the unique password for the WiFi access point; or directly use the monitor screen of the robot.
- In a browser (Chrome is recommended), go to the address is the IP of the robot and sign in.

4.4. Driving Robot in Manual Mode
Users can use the remote control to move the Basebot back and forth, left and right in the Manual mode of the Basebot. When pressing the handle button, the handle starts automatically, and the indicator starts flashing. When inserting the handle receiver into the USB port on the robot panel, and pressing the MODE button to make the indicator light of the handle always on, it indicates that the handle is connected successfully.
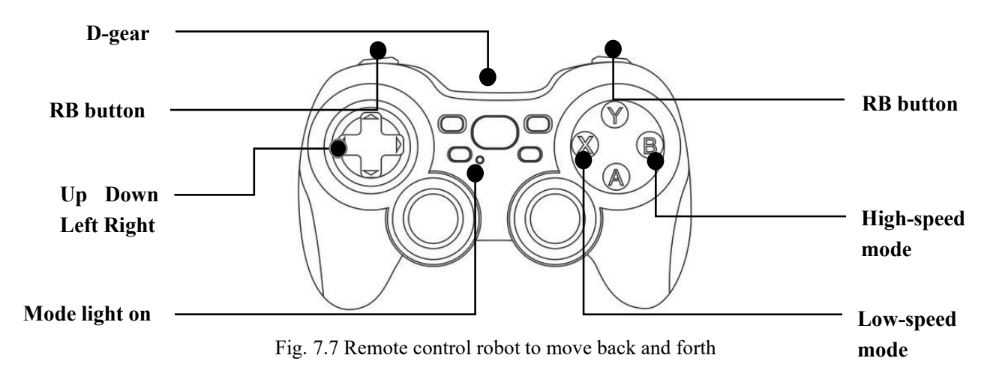
Methods of remote-controlling robot movement:
-
When pressing and holding the "X" and "RB" buttons with the right hand, the robot will enter the low-speed movement standby state, at this time, the left hand can operate the Up Down Left Right buttons to realize the movement of the robot.
-
When pressing and holding the "B" and "RB" buttons with the right hand, the robot will enter the high-speed movement standby state, at this time, the left hand can operate the Up Down Left Right buttons to realize the movement of the robot.
-
If the right or left hand releases the keys, the robot will immediately stop moving and enter the moving lock state, and in order to avoid the wrong touch of the key causing the robot to move, the robot can only move when the button is pressed with both hands at the same time.
-
When the emergency stop of the robot is triggered, the robot status light turns red, and the robot movement function will be locked. At this moment, by pressing the left and right shoulder buttons of the hand manipulator simultaneously, the emergency stop state of the robot can be temporarily released, and the robot's movement can be controlled through the hand manipulator.
Tips: Please release the left hand first when stopping moving, and wait for the robot to stop moving before releasing the right hand.
4.5. Moving The Robot by Hand
Users should generally avoid moving the robot by hand, but if, for example, the robot gets stuck near an obstacle and cannot be moved by manual control, it is possible to do so. Before moving the robot by hand, make sure the Auto/Manual button is switched to the Manual mode on the button panel of the robot’s body.
To move the robot by hand, either push or pull it.
NOTICE
- When handling the robot, do not push or pull the robot sideways, and do not use the covers for pushing or pulling.
4.6. Checking The Hardware Status
Contact our Technical team for detailed information.
4.7. Shutting down The Robot
To shut down TVC Basebot, follow these steps:
- Ensure that the robot is not moving or executing an action.
- Press and hold the power button for 2-3 seconds to shut the robot off. When the robot finishes the shutdown process, the status and the signal lights go off.
5. Battery and Charging
5.1. Charging The Robot
TVC Basebot is compatible with two charging modes of automatic charging and manual charging, and the manual charging connector is installed on the robot. The manual charging connector can be used for charging in unconventional circumstances. When manual charging is used, the brush of the charger will also be with electricity, so manual charging is prohibited under general working conditions.
In the case of automatic charging, an automatic charging station is placed in the working environment. The robot automatically returns to the charging station and connects when its battery level is lower than a limit, or regularly recharges between deliveries to make the AMR run continuously. The charging station is easy to install in any facility.
For automatic charging, before using this feature, users have to follow these steps:
- Create a charging marker: using TVC WebApp
- Create an auto-charge mission and execute
- Put the charging station in the working environment with the same position on the map and power it to be used.
5.2. Enabling Fast Swap
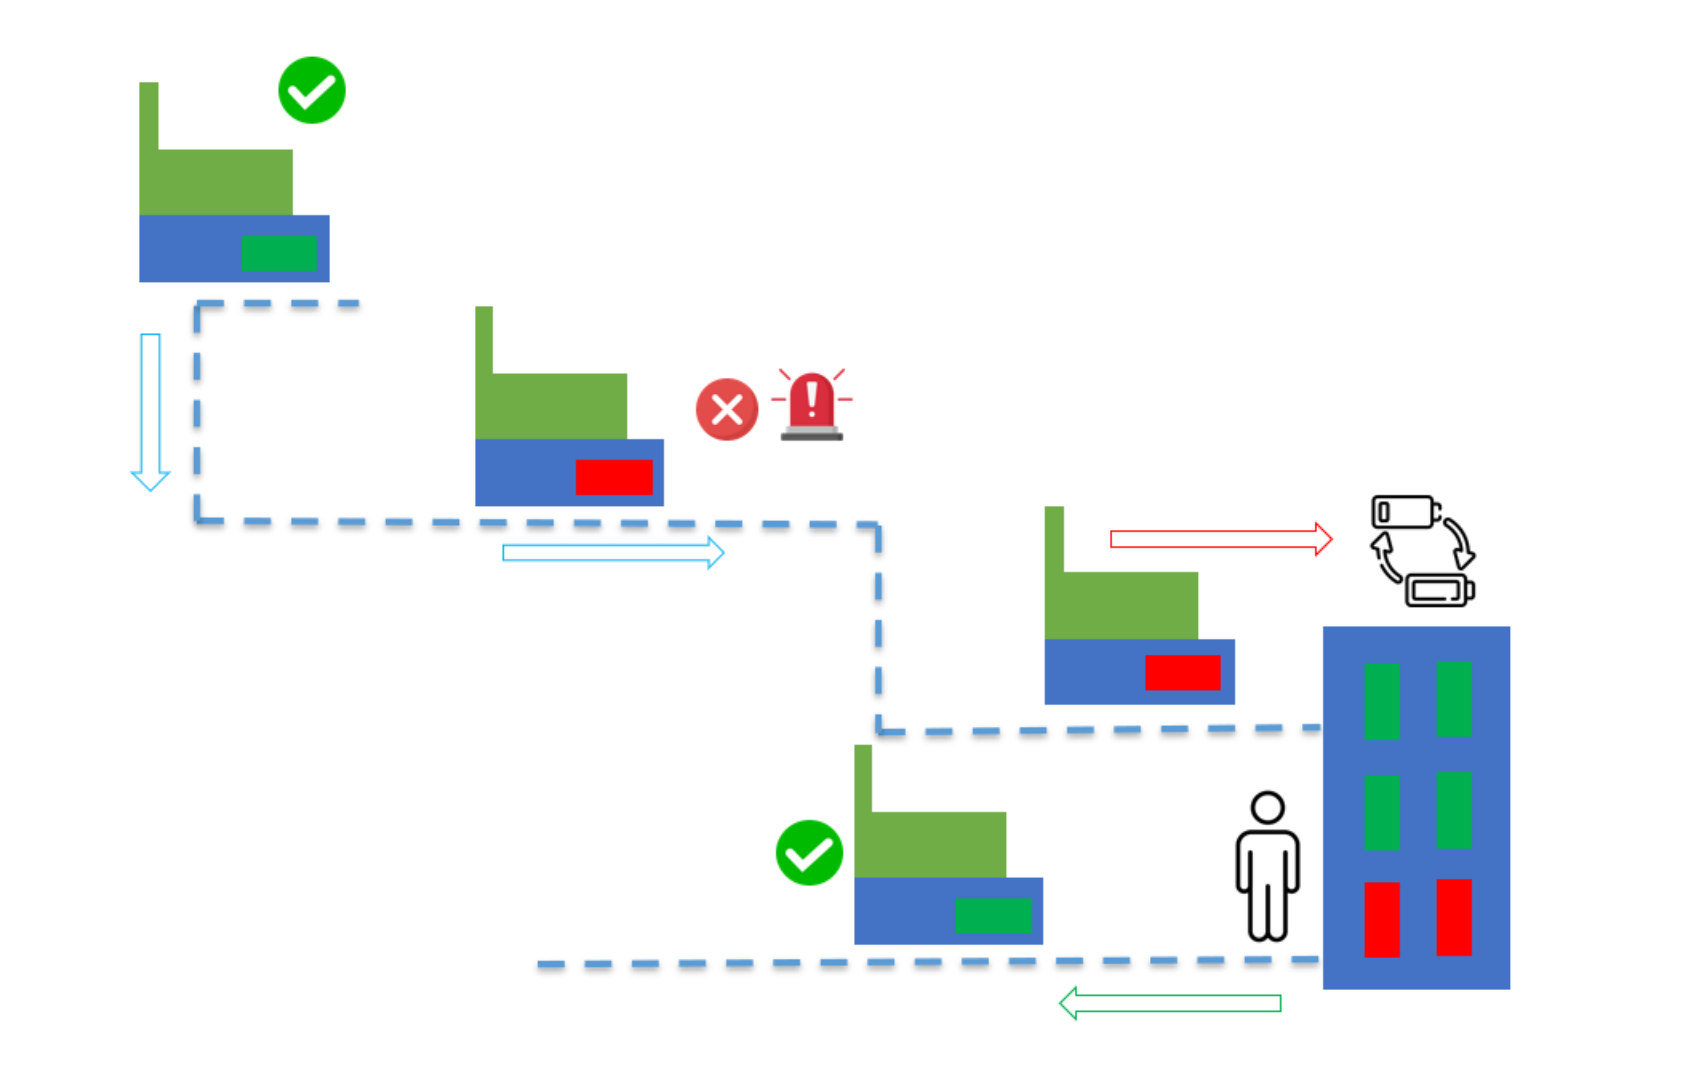
When the AGV's power runs low, designated staff manually swap out the battery pack, enabling the AGV to resume operation. Once replaced, the battery pack is recharged and ready for future use. This process is known for its simplicity and speed, making it ideal for situations demanding swift work response and facing vehicle shortages.
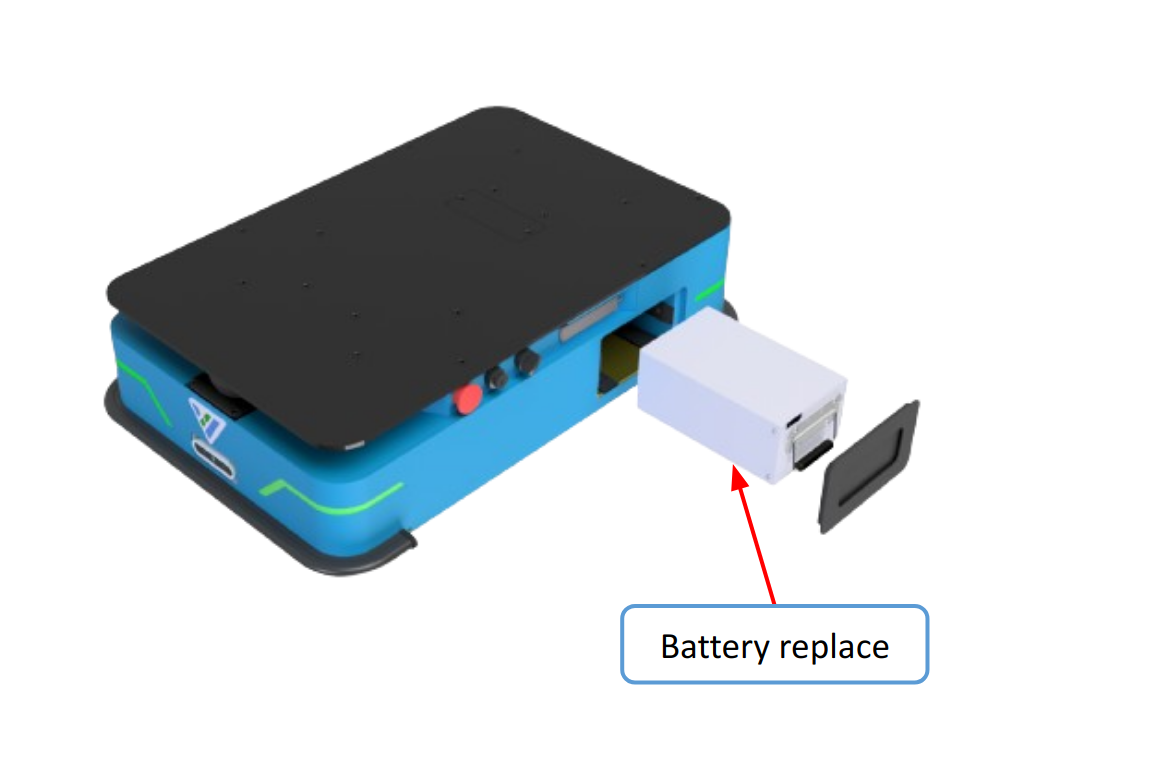
Process:
- AMR works normally with a full battery
- When the battery is low (approximately 25% - this parameter is customizable), it warns the user:
- Warning message in the AMR monitoring application
- Warning light
- Warning sound
- AMR will move to a decided position (battery station) for manual battery replacement
- After the battery is fully charged, AMR can restart and go back to the Standby area or continue its current mission
Contact our Technical team for detailed information.
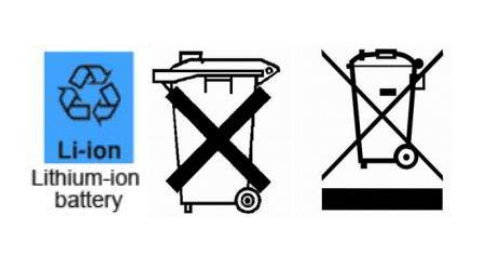
5.3. Battery Disposal
Return unserviceable batteries to relevant facilities in accordance with local statutory regulations.
A crossed-out wheeled bin indicates that the product needs to be disposed of separately and not as municipal waste.
You are legally obliged to return used batteries and rechargeable batteries. Disposing of used batteries in household waste is prohibited. Batteries containing hazardous substances are marked with the crossed-out wheeled bin. The symbol indicates that it is forbidden to dispose of the product via domestic refuse. The chemical symbols for the respective hazardous substances are Cd = Cadmium, Hg = Mercury, and Pb = Lead.
6. Specifications and Parameters
| PRODUCT TYPE | AMR PLATFORM |
|---|---|
| Dimensions (l x w x h) | 835 x 565 x 220 mm (Customizable) |
| Navigation method | Laser SLAM Navigation |
| LiDAR model | SICK/Nanoscan3 |
| Maximum load | 50, 100, 200 kg |
| AMR weight (battery included) | 75 kg |
| Ground clearance | 25 mm |
| Maximum speed | 1.2 m/s |
| Rotating diameter | 930 mm |
| Navigation accuracy | ± 1.5 cm/± 1.5° |
| Fully charged time | ≤3h |
| Charging method | Automatic/manual |
| Battery life | 6-8h |
| LiDAR safety distance (front and back) | 3-5m |
| Mechanical safety | Emergency stop button, Reset button, safety bumper |
| Battery | 24V/30AH |
| Communication method | Wifi: support dual-band 2,4G/5G, IEEE802.11B/G/N |
| Climbing capacity | ≤3° |
7. Safety System
7.1. System Overview
The safety system is controlled mainly by the safety PLC. The PLC regulates inputs and outputs from safety-related functions or interfaces involved with ensuring the safety of personnel working near the robot.
There are three different stopped states:
- Operational stop
- Protective stop
- Emergency stop
The last two types of stop are monitored by the safety PLC.
Operational stop
The robot is in Operational stop when it is stopped through the robot interface either through a mission action or by pausing the mission. The top module and all moving parts are still connected to a power supply.
Protective stop
The robot enters the Protective stop automatically to ensure the safety of nearby personnel. When the robot enters a Protective stop, internal safety contactors are switched so the robot's top module and all moving parts of the robot do not receive power. You can hear the safety contactors emit audible clicks when they are switched.
When the robot is in Protective stop, the status lights of the robot turn red, and you are not able to move the robot or send it on missions until you bring the robot out of the Protective stop. The following cases describe the various Protective stops and how to bring the robot out of them:
- A safety laser scanner detects an object in its active Protective field: Remove the object from the active Protective field. The robot will resume its operating state after two seconds.
- Switching between Manual mode and Autonomous mode: After turning the Operating mode key to switch operating modes, the robot enters a Protective stop.
- The safety system detects a fault, or the motor control system detects a discrepancy: To bring the robot out of Protective stop, resolve the fault causing the error. Use information regarding the error from the robot interface to determine the fault. For further guidance, see the troubleshooting guides on the Distributor site.
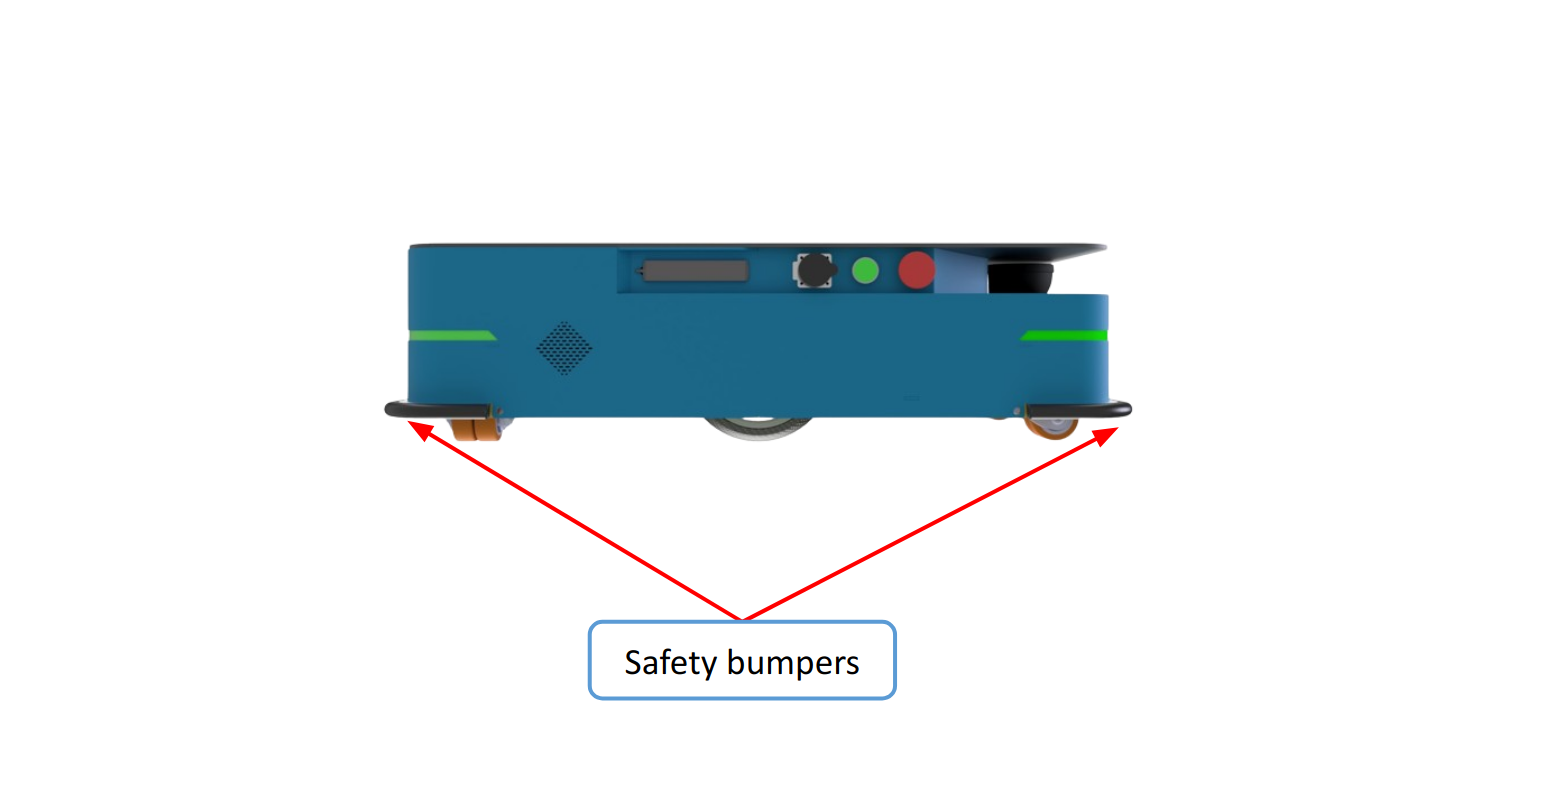
- Otherwise, safety bumpers are mounted on the back and front edges of the robot's body cover. The bumpers are shock absorbers that produce a signal to the robot to stop as a result of force.
Emergency stop
The robot enters an Emergency stop when an Emergency stop button has been pressed physically. When you press the Emergency stop button, internal safety contactors are switched so the robot's top application and all moving parts of the robot do not receive power. You can hear the safety contactors emit audible clicks when they are switched.
When the robot is in an Emergency stop, the status lights of the robot turn red, and you are not able to move the robot or send it on missions until you bring the robot out of the Emergency stop. To do this, you must release the Emergency stop button and then press the Resume button. If the robot is in Emergency stop, it will immediately resume an operating state after you press the flashing Resume button.
CAUTION Emergency stop buttons are not designed for frequent use. If a button has been used too many times, it may fail to stop the robot in an emergency situation, and nearby personnel may be injured by electrical hazards or collisions with moving parts.
- Only press the Emergency stop buttons in emergencies.
- Regularly check that all Emergency stop buttons are fully functional—see Maintenance Section.
- Use the robot interface to stop the robot in non-emergency situations.
7.2. Obstacle Avoidance
When Basebot faces an obstacle, it decides in real time whether to move to a new path or stop for the obstacle to pass by. This function prevents the robot from colliding with personnel or obstacles by stopping it before it collides with any detected obstacles. It does this using the safety laser scanners.
The safety laser scanners are programmed with two sets of Protective fields. One field set is used when the robot is driving forward and the other when it is driving backward. The Protective field sets are part of the robot’s Personnel detection safety function. Each Protective field in the sets is an individually configured contour around the robot. The robot activates the correct field based on the speed. If a person or object is detected within the active Protective field, the robot enters a Protective stop until the Protective field is cleared of obstacles for at least two seconds. The parameters of the Protective field sets are decided by default by Techvico’s Technical team and can be modified based on the requirements of the clients and the specific condition.
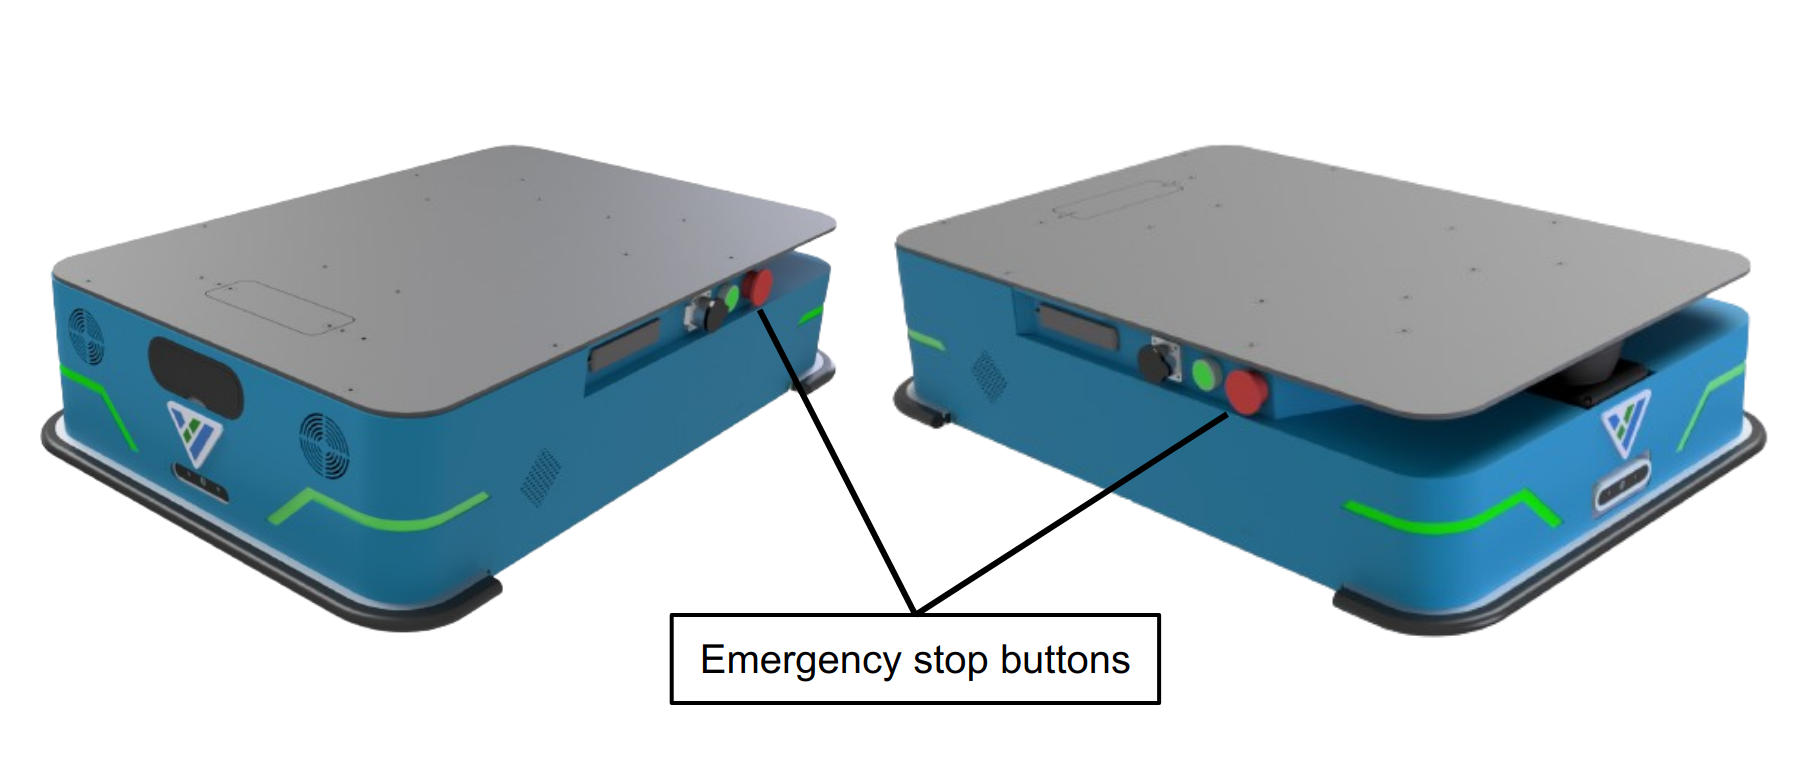
7.3. Emergency Stop Buttons
There are two Emergency stop buttons on TVC Basebot. When one of the buttons is pressed, it breaks the Emergency stop circuit triggering an Emergency stop. The Emergency stop circuit runs through both of the Emergency stop buttons and connects to the safety PLC through the Auxiliary emergency stop interface.
7.4. Light Indicators and Speakers
Status lights
The robot uses light indicators to let people in the environment know what the robot is currently doing or planning to do. There are four LED light bands on all four sides of the robot, which use colors and light motion patterns to signal the current status of the robot.
Speakers
In TVC WebApp, you can upload new sounds to the robot or edit the volume and length of the default sounds. Sounds are used in missions and can be used as alerts: “Please step aside” or to attract people's attention, for example, when the robot has arrived at a position. When the robot drives with muted Protective fields it emits a warning sound. In Settings, you can choose which sound the robot makes and the volume of the sound.
CAUTION Changing the safety system can cause the robot to not comply with safety standards.
- Do not disable the sound in the safety system.
CAUTION It is the responsibility of the commissioner to ensure that the warning sounds are audible in the robot's work environment.
8. Commissioning and Usage
8.1. Analysis of The Work Environment
The work environment of the robot must fulfill a number of requirements for the robot to function properly and safely. This section describes the factors that must be considered when the robot is being commissioned to function in a work environment.
Surfaces
The floor surface of the work environment must be dry. TVC Basebot functions on many different types of surfaces, but some materials can affect the performance and safety of the robot, such as very thick carpets or slippery floors. It is the responsibility of the commissioner to test the performance and safety of the robot on the surfaces in the work environment.
Light, reflections, and materials
Bright sunlight and reflective or transparent objects can affect the performance of the robot's laser scanners and cameras. This can result in the robot detecting nonexistent objects or failing to detect real objects. Likewise, docking to markers made in very high gloss or transparent materials can reduce the effectiveness of the robot's scanners, hindering successful docking. It is the responsibility of the commissioner to test if sunlight, reflections from high gloss materials, and transparent objects affect the robot's performance or safety.
Temperature and humidity
Temperatures outside of the approved temperature range can affect the performance and durability of the robot—see specifications on the Techvico website. This is especially relevant for the robot's battery.
Inclines, doorways, gaps, and sills
The robot must operate within the approved specifications for driving on inclines, through doorways, and over gaps and sills—see specifications on the Techvico website. Operating in areas that do not meet the specifications may result in the robot failing to complete the missions or losing control of its load.
Space
The robot must have sufficient space to operate efficiently. Determine during commissioning if the robot has sufficient space to drive, dock, turn, and perform other tasks. Make sure to test each mission under the most likely operating conditions to determine if there is enough space for the robot to maneuver.
Dust
Dusty environments can affect the performance and durability of the robot. Dust can get into the robot's computer and mechanical parts, affecting their performance and durability, and it can obstruct the view of the robot's sensor system. Make sure the environment TVC Basebot operates in is suitable for its IP rating—see specifications on the Techvico website.
Static landmarks and dynamic obstacles
The robot uses static landmarks to navigate by. If it cannot detect enough distinguishing landmarks, it cannot navigate the map efficiently.
8.2. Risk Assessment
To achieve a safe installation, it is necessary to make a risk assessment of TVC Basebot in the environment it will be used in. This is the responsibility of the commissioner. The risk assessment must cover both TVC Basebot itself and also take into account potential load transfer stations, work cells, and the work environment.
NOTICE Techvico takes no responsibility for the creation and performance of the risk assessment, but we provide information and guidelines that may be used in this section.
It is recommended that the commissioner follows the guidelines in EN ISO3691-4, EN 1175, or other relevant standards to conduct the risk assessment.
A risk assessment of the application must be used to determine the adequate information for users. Special attention to at least the following Essential Health and Safety Requirements (EHSR) must be taken:
- 1.2.2 Control devices
- 1.3.7 Risk related to moving parts
- 1.7.1 Information and warning on the machinery
- 1.7.2 Warning of residual risks
- 1.7.3 Marking of the machinery
- 1.7.4 Instructions
The risk assessment will lead to new instructions that shall be written by the party who draws up the CE marking. The instructions must at least include:
- Intended use and foreseeable misuse.
- A list of residual risks.
- Training required for personnel.
8.3. Configurations and Settings using WebApp
Users can build a map of Basebot's working environment with a joystick and label the map according to its environment layout or upload an existing 2D layout plan. In the case of creating a map directly using the joystick, users have to use TVC NAV - Techvico’s web-based application.
To access the TVC NAV application, users can use the user interface WebApp on their computer/ laptop that is connected to the TVC Basebot or directly from the screen of Basebot, which is included in the TVC NAV package. In WebApp, users can collect data, create a raw map, edit maps, create and execute missions, etc.
Approach to access WebApp:
- Open a web browser on your computer/laptop connected to the robot or directly on the robot screen. We highly recommend using the Chrome browser.
- In the address bar, enter the IP of the TVC Basebot. WebApp will open.
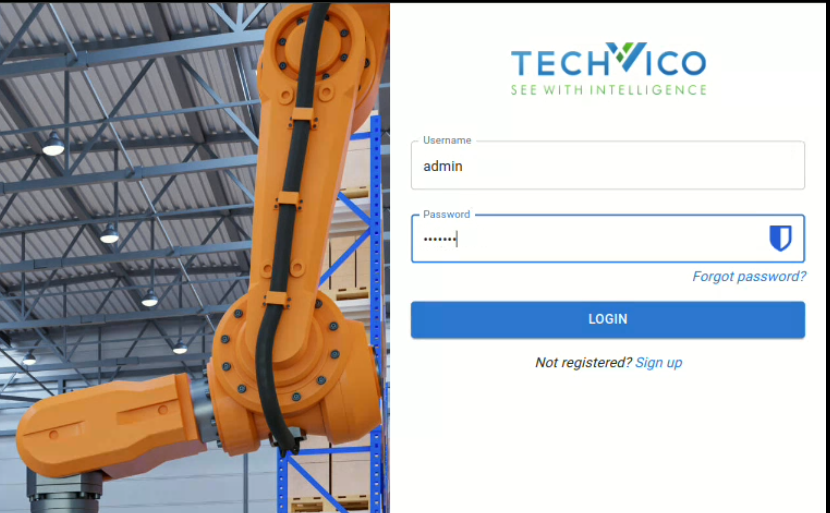
- After logging in user’s account - which will be given by Techvico’s Technical Team, a Dashboard page will appear.
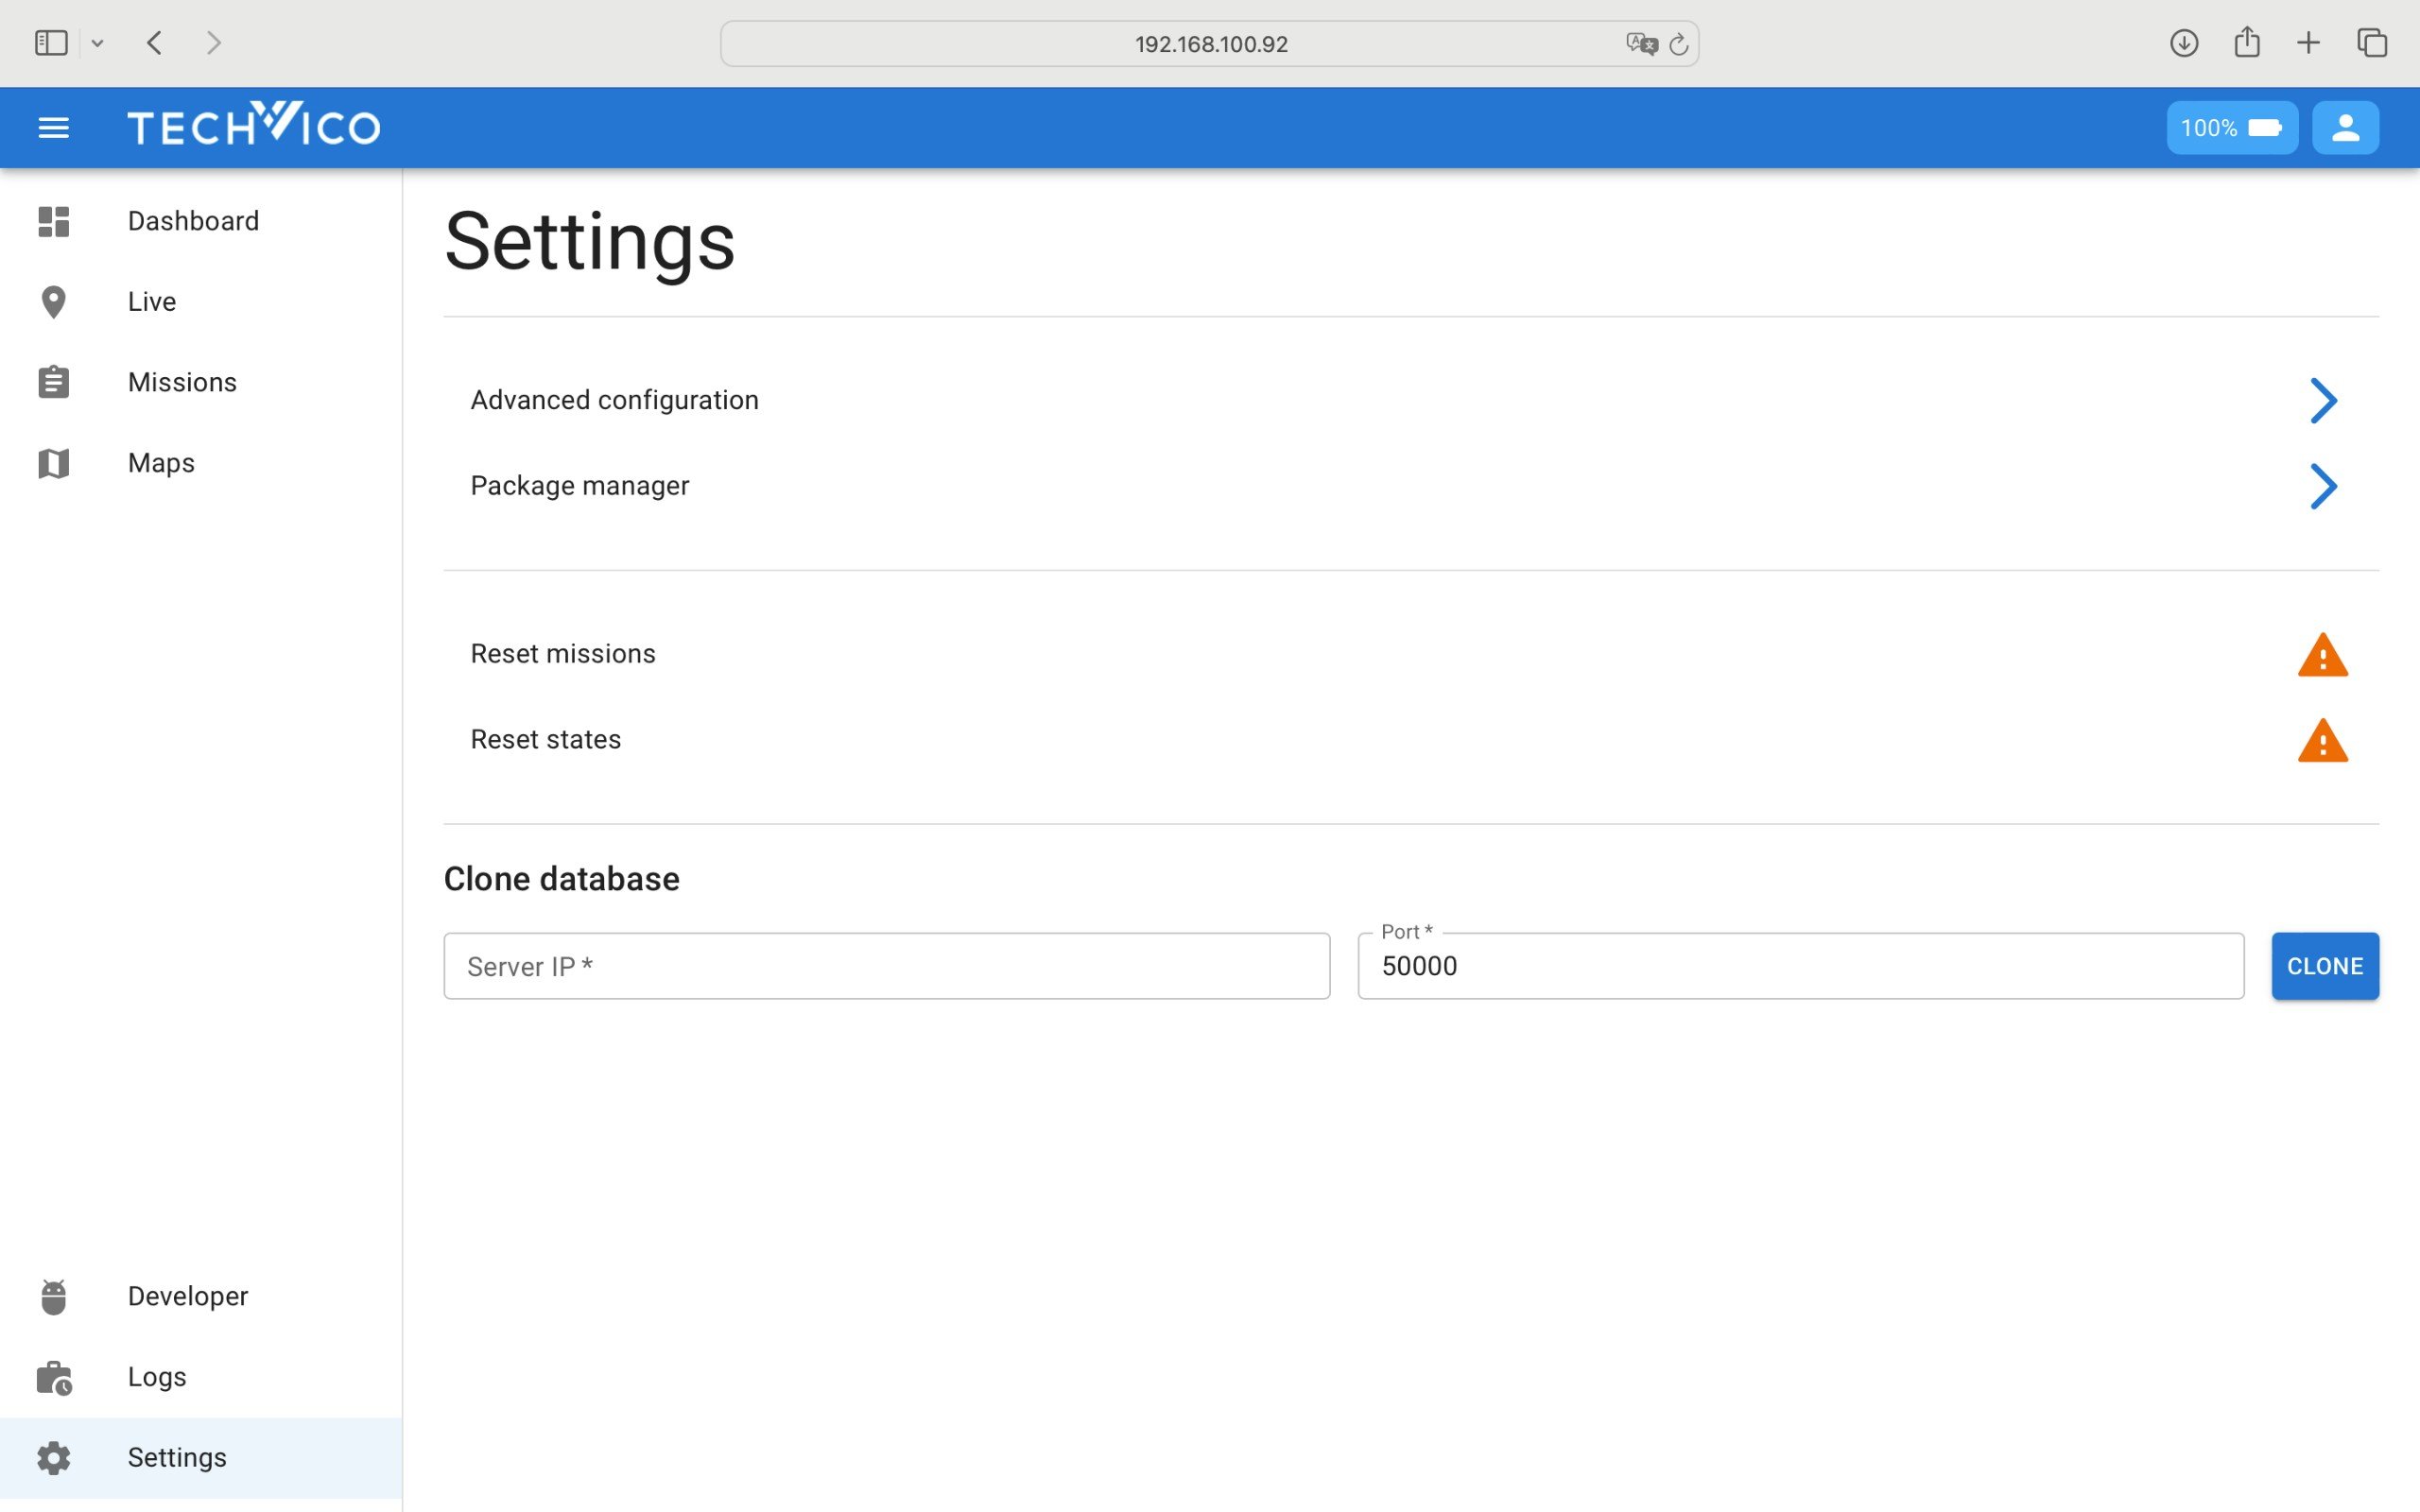
- Users can access the Settings page to make a variety of modifications:
- General Settings: Reset missions, change states, clone databases, and more.
- Advanced Settings: Configure parameters for the mapping and localization processes.
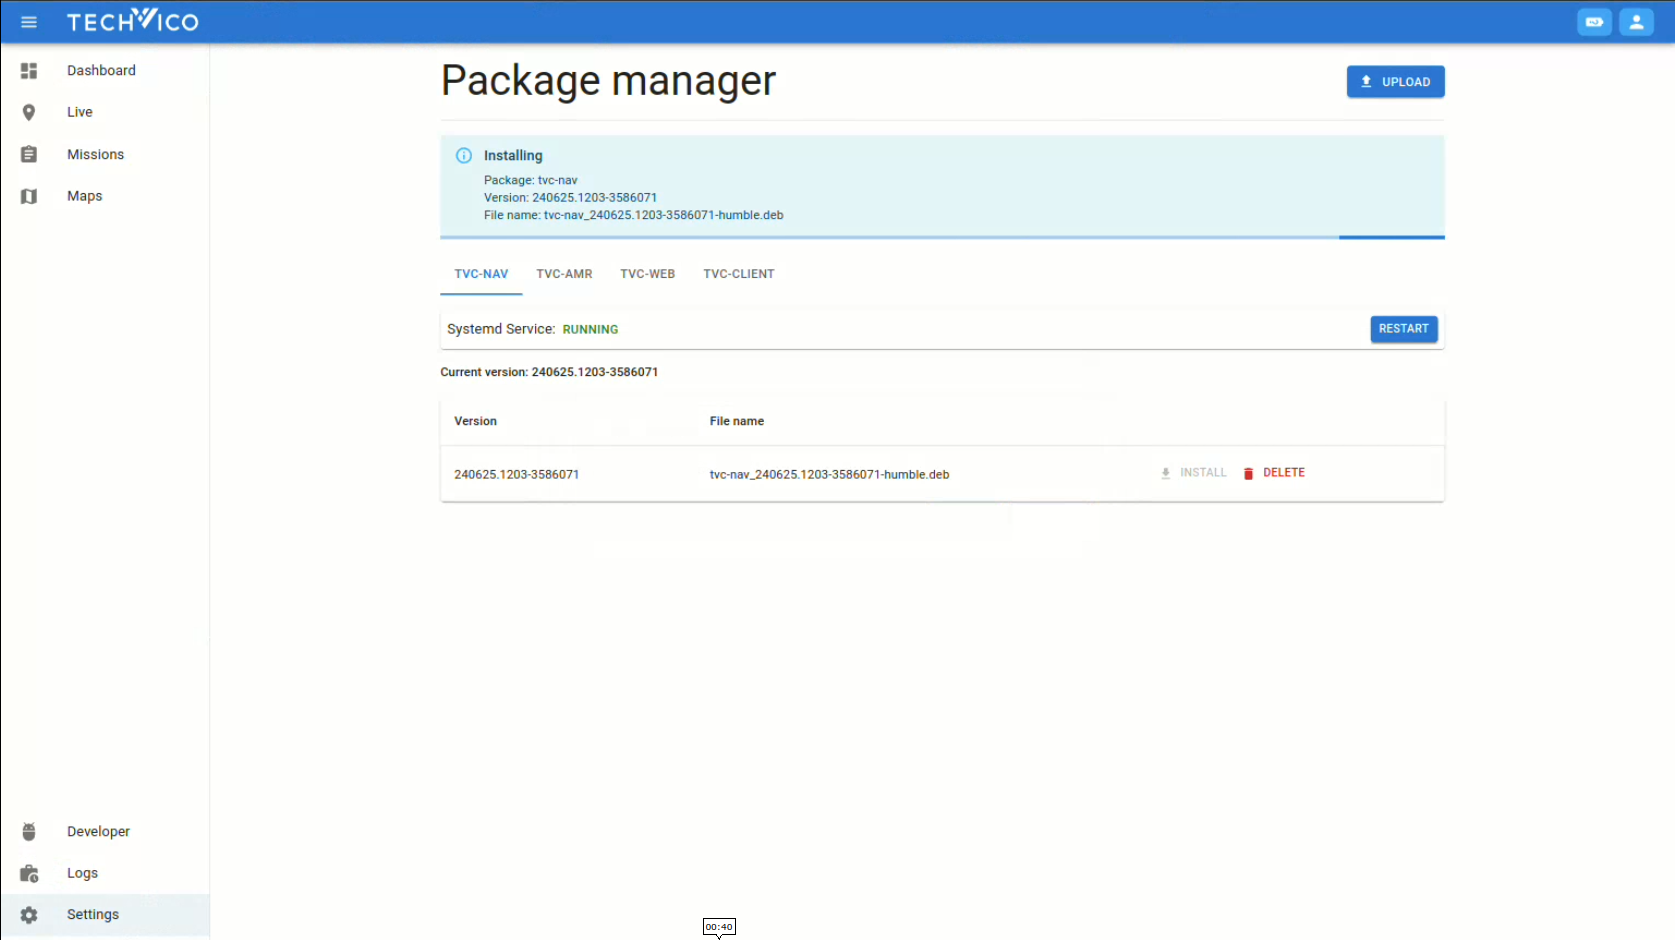
- Package Manager: Check the current Web App version and import the latest version from the Techvico technical team.
8.4. Creating Maps
Prerequisites:
- The 2D LiDAR sensor(s) are connected and integrated into the localization controller and has/have been installed on the AMR.
- The localization controller receives scan data from the 2D LiDAR sensor.
- The AMR is connected and can be controlled by one of the following controllers:
- A joystick connected to the AMR
- Virtual joystick on the bottom right corner of the Map View
Creating map:
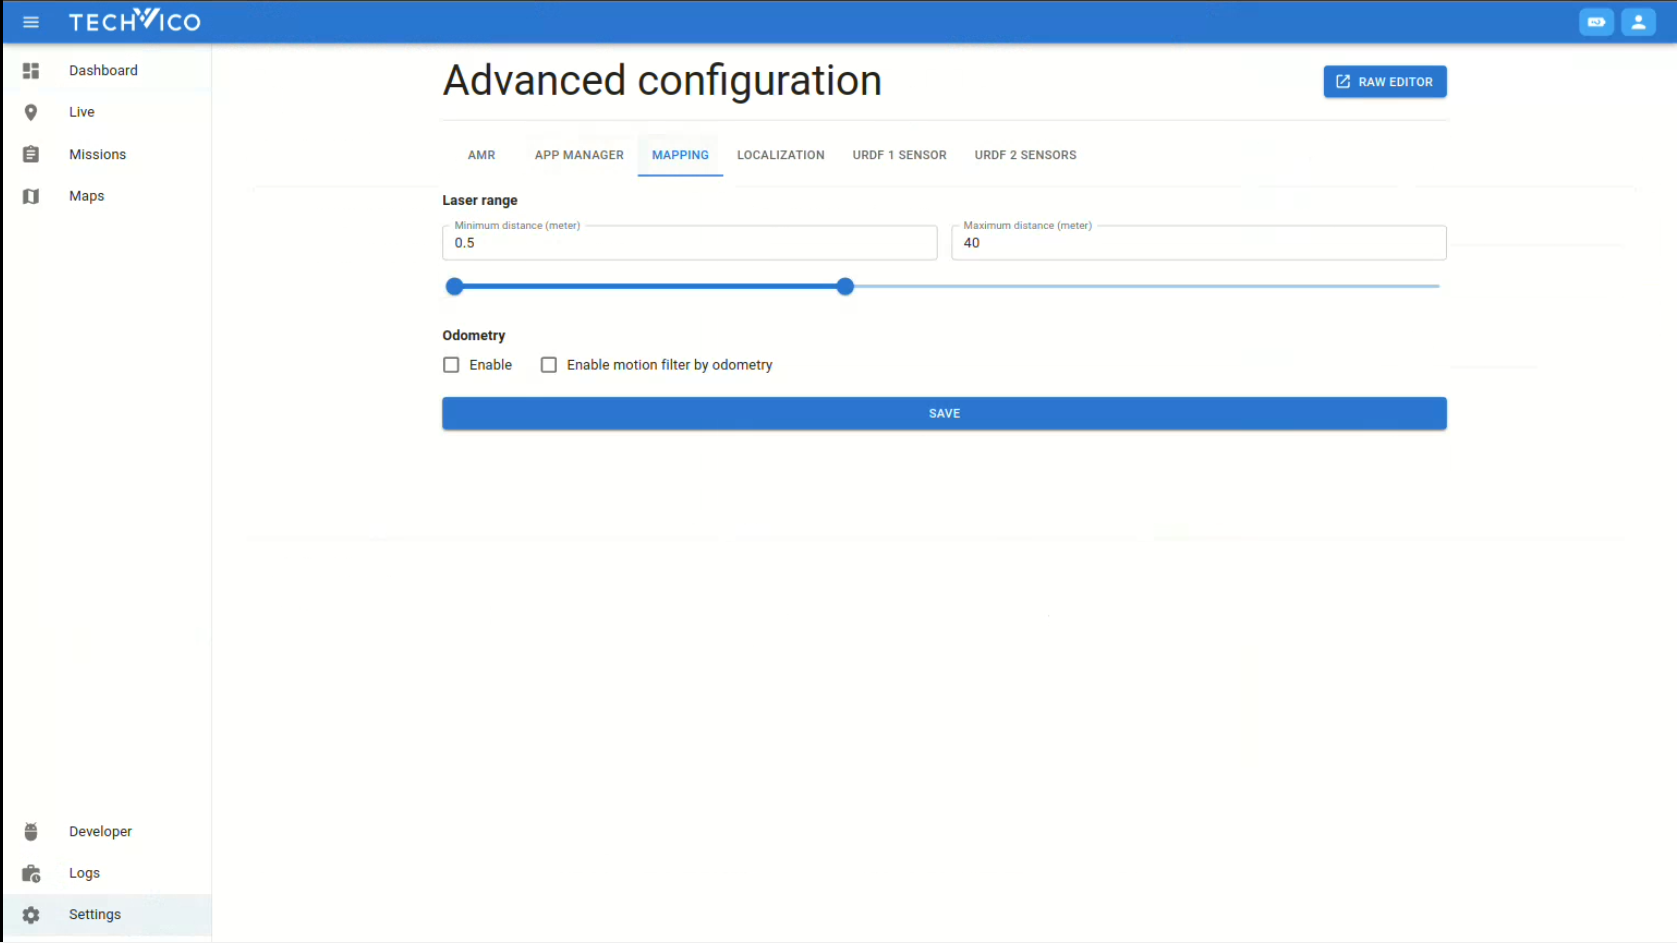
Before creating a map, click the Settings page, then choose the Advanced configuration, MAPPING tab to change parameters related to the Mapping process and save.
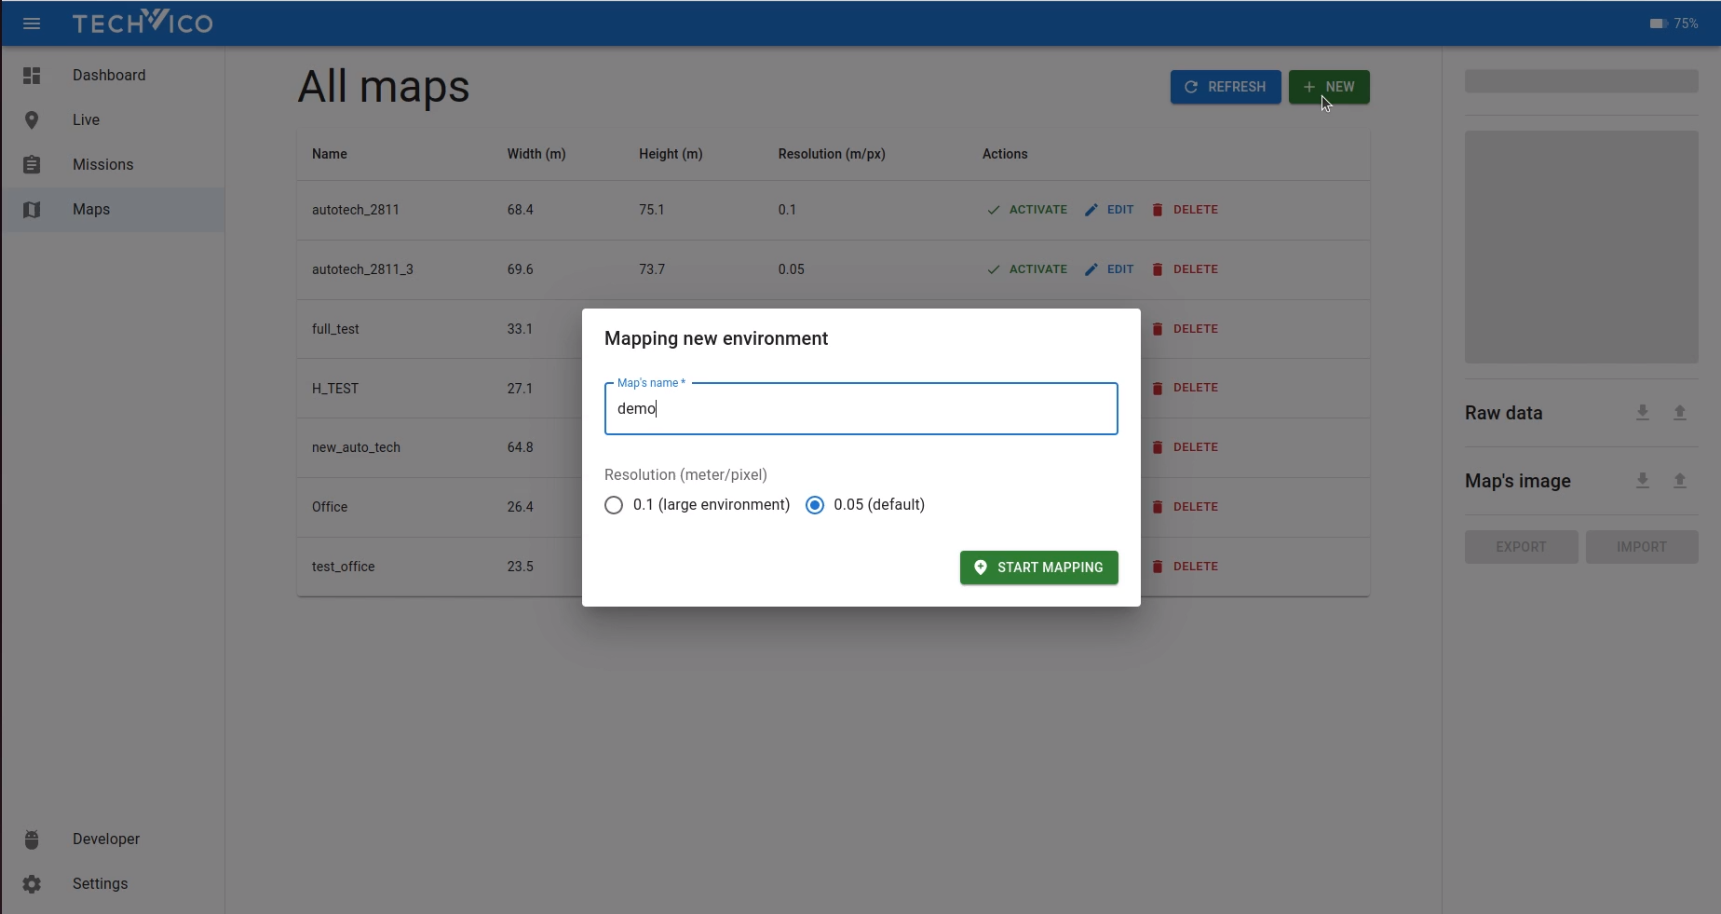
On the Maps page, click the NEW button to create a new map. Name the new map, choose the resolution, and click the START MAPPING button to start the map scanning process.
At this time, the WebApp automatically switches to the Live page to visualize the current state of map creating process. Use the physical or virtual joystick to control the AMR driving through all areas. The vehicle must be in a similar position at the beginning and the end of the recording.
Note: Move the vehicle smoothly and steadily when acquiring the raw sensor data. We highly recommend reducing the vehicle speed for this purpose.
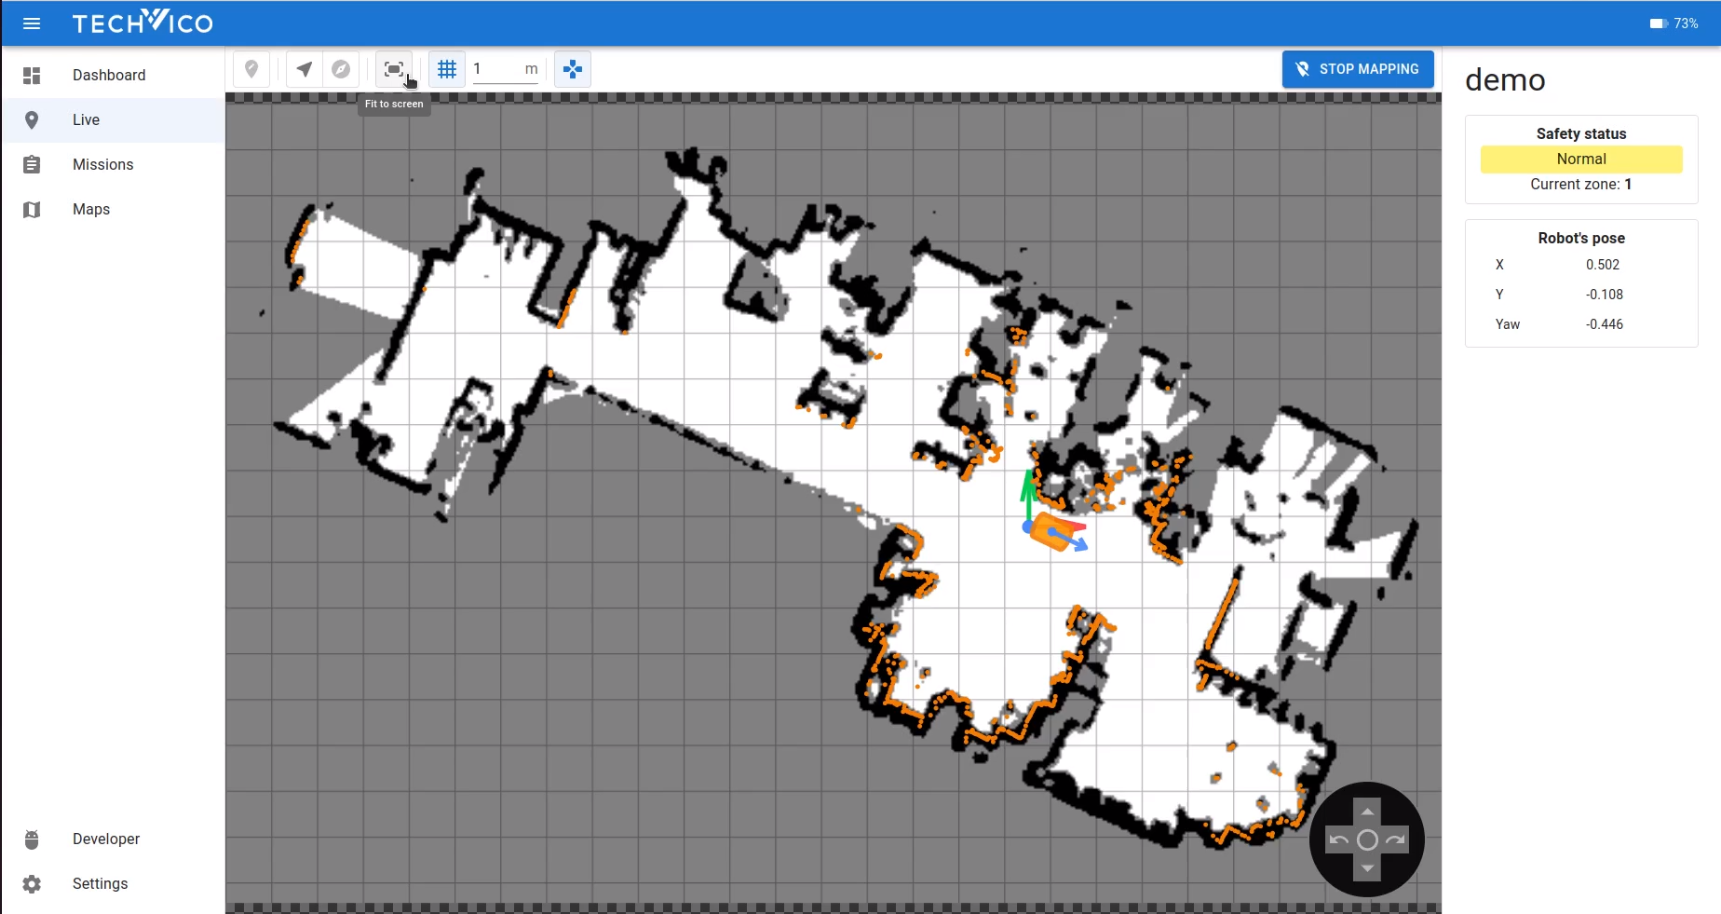
On the toolbar at the top of the Map view, users can choose some display options for better visualization when mapping:
![]() : Fit the whole map to the screen
: Fit the whole map to the screen
![]() : Follow the position of the robot
: Follow the position of the robot
![]() : Follow the position and the direction of the robot
: Follow the position and the direction of the robot
![]() : Show/Hide grid, change the grid size
: Show/Hide grid, change the grid size
When all areas are scanned, users can click the STOP MAPPING button at the top right corner, and a new dialog appears for choosing the map origin.
Choose map origin: After completing the map scanning process, users can use the map's default origin (the robot's position when starting mapping) or click and drag on the “Choose map origin” window to choose a new origin.
- Choose the default origin: Just click CONFIRM
- Decide a new origin: use the center mouse click to zoom in/out and rotate the map. Then use the left mouse click and drag to choose the new origin, and click CONFIRM
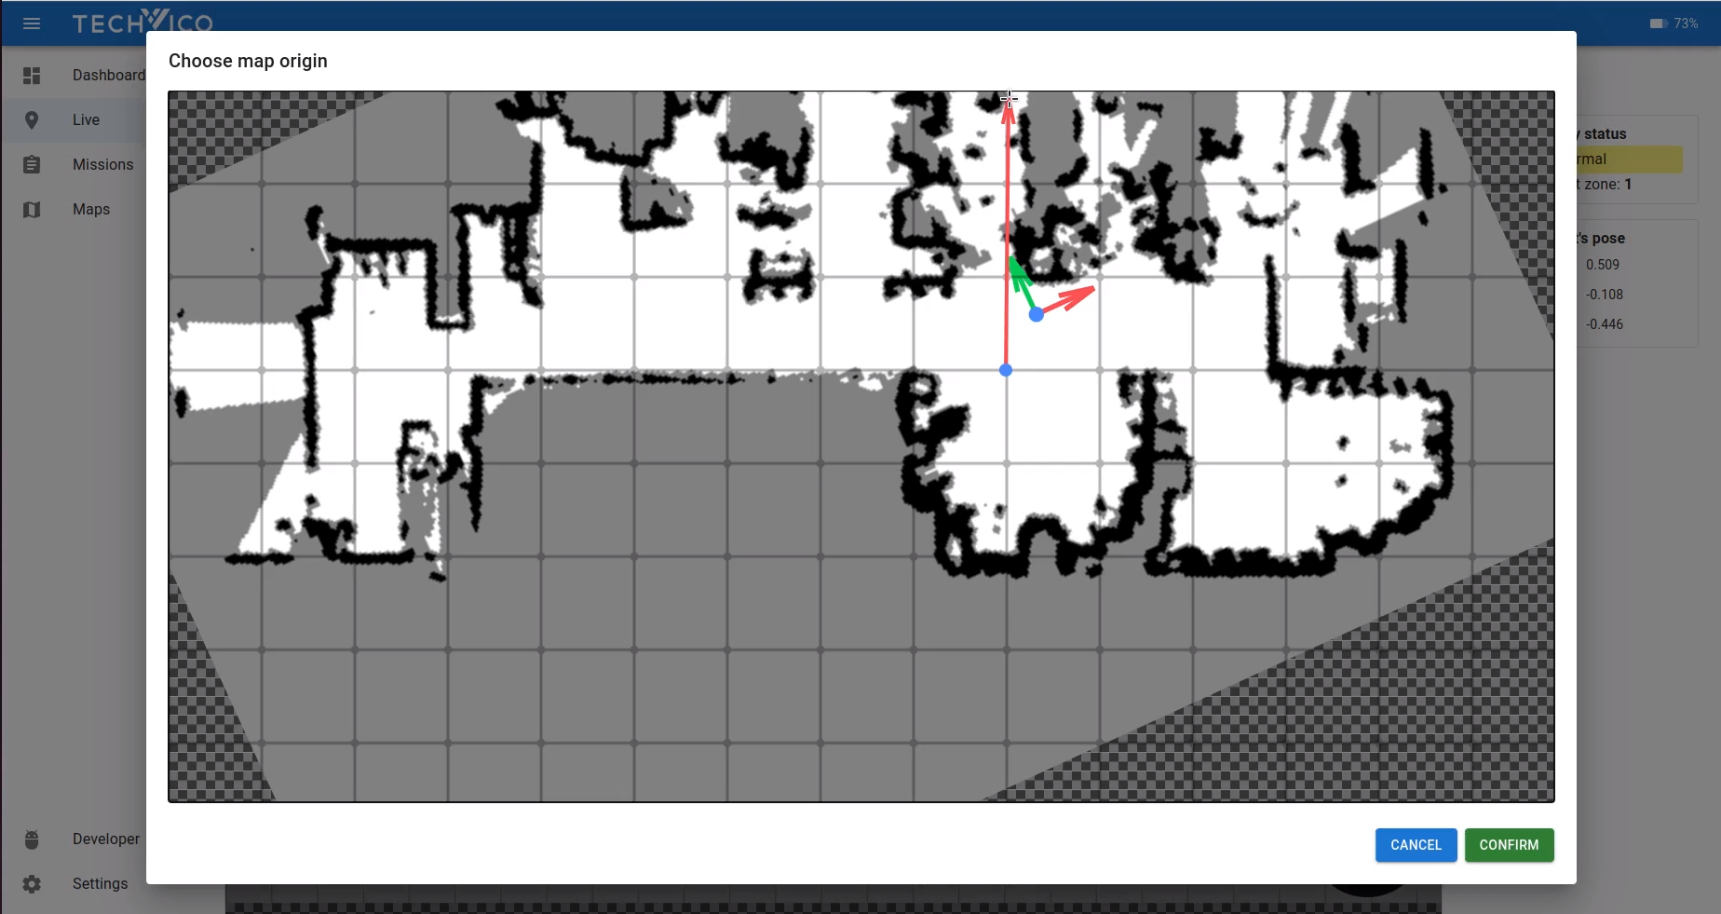
Tips: rotate the map to make the main boundary line parallel with the grid, and draw the origin direction overlapping the grid line to create a better map view.
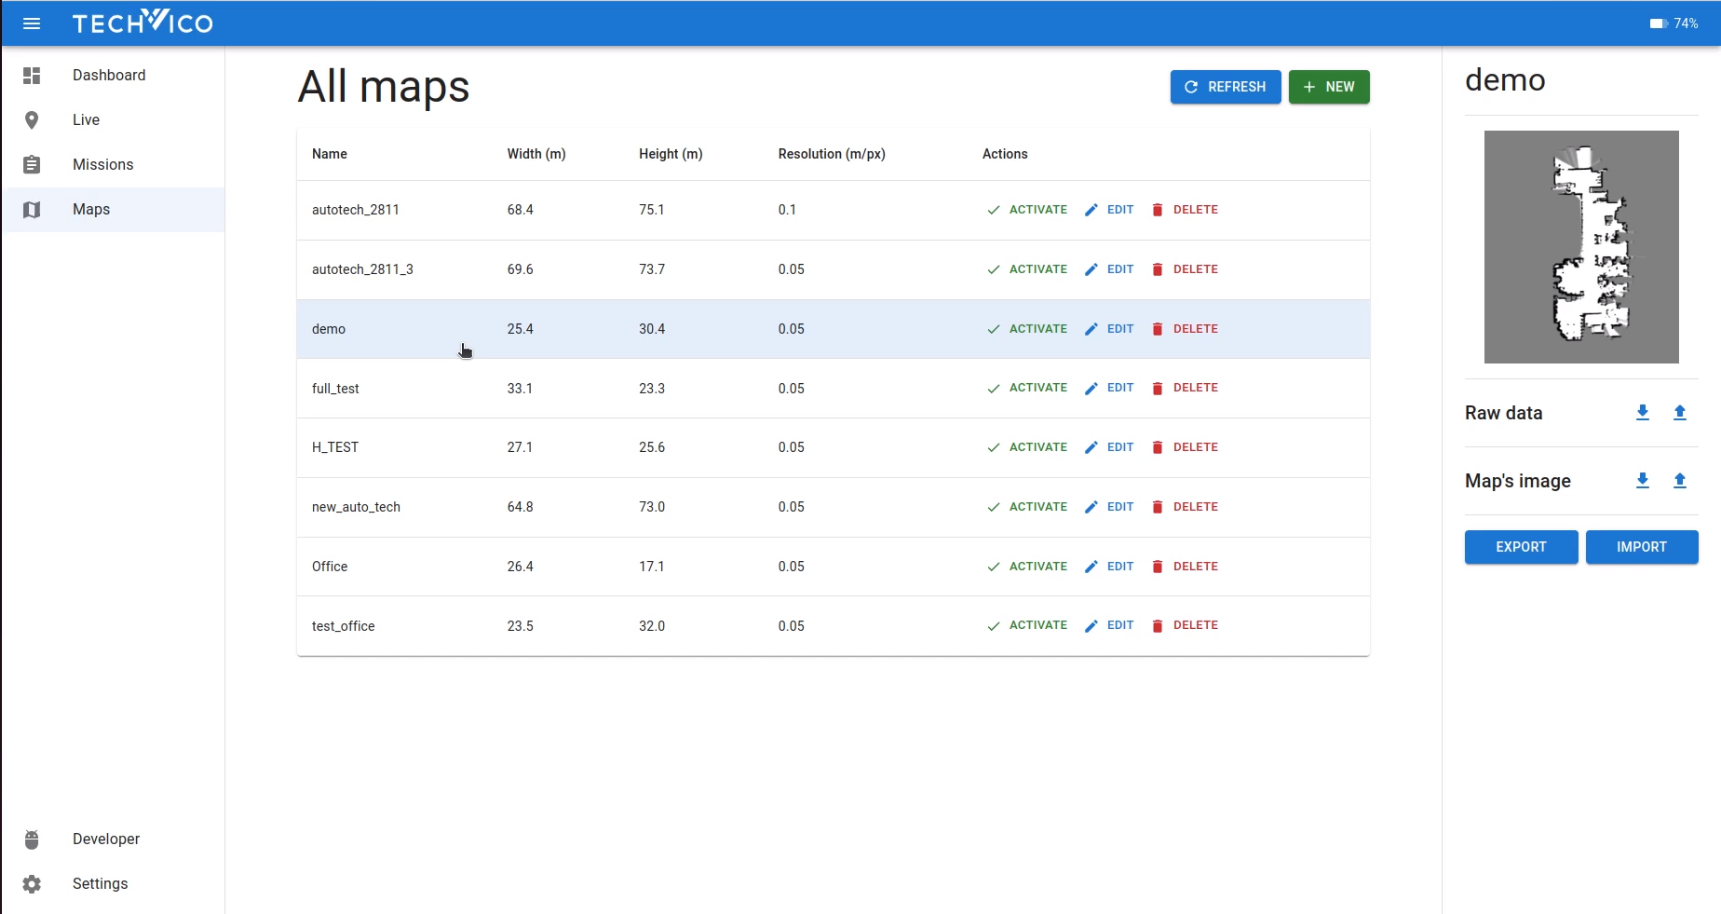
After that, a new map is created and appears in the map list on the Maps page. Users can export the raw map file or image file by clicking the map and choosing the download button on the left status bar.
Remove noise
A created map can be edited, removed noice by using our additional Map Tool to increase the final map quality. Contact your distributor for specific information or assistance from Techvico Technical Support.
8.5. Markers, Paths
On the Maps page, users can click the DELETE button to delete a map, or click the EDIT button to start editing. WebApp will change into the map view to edit directly on it.
Markers
-
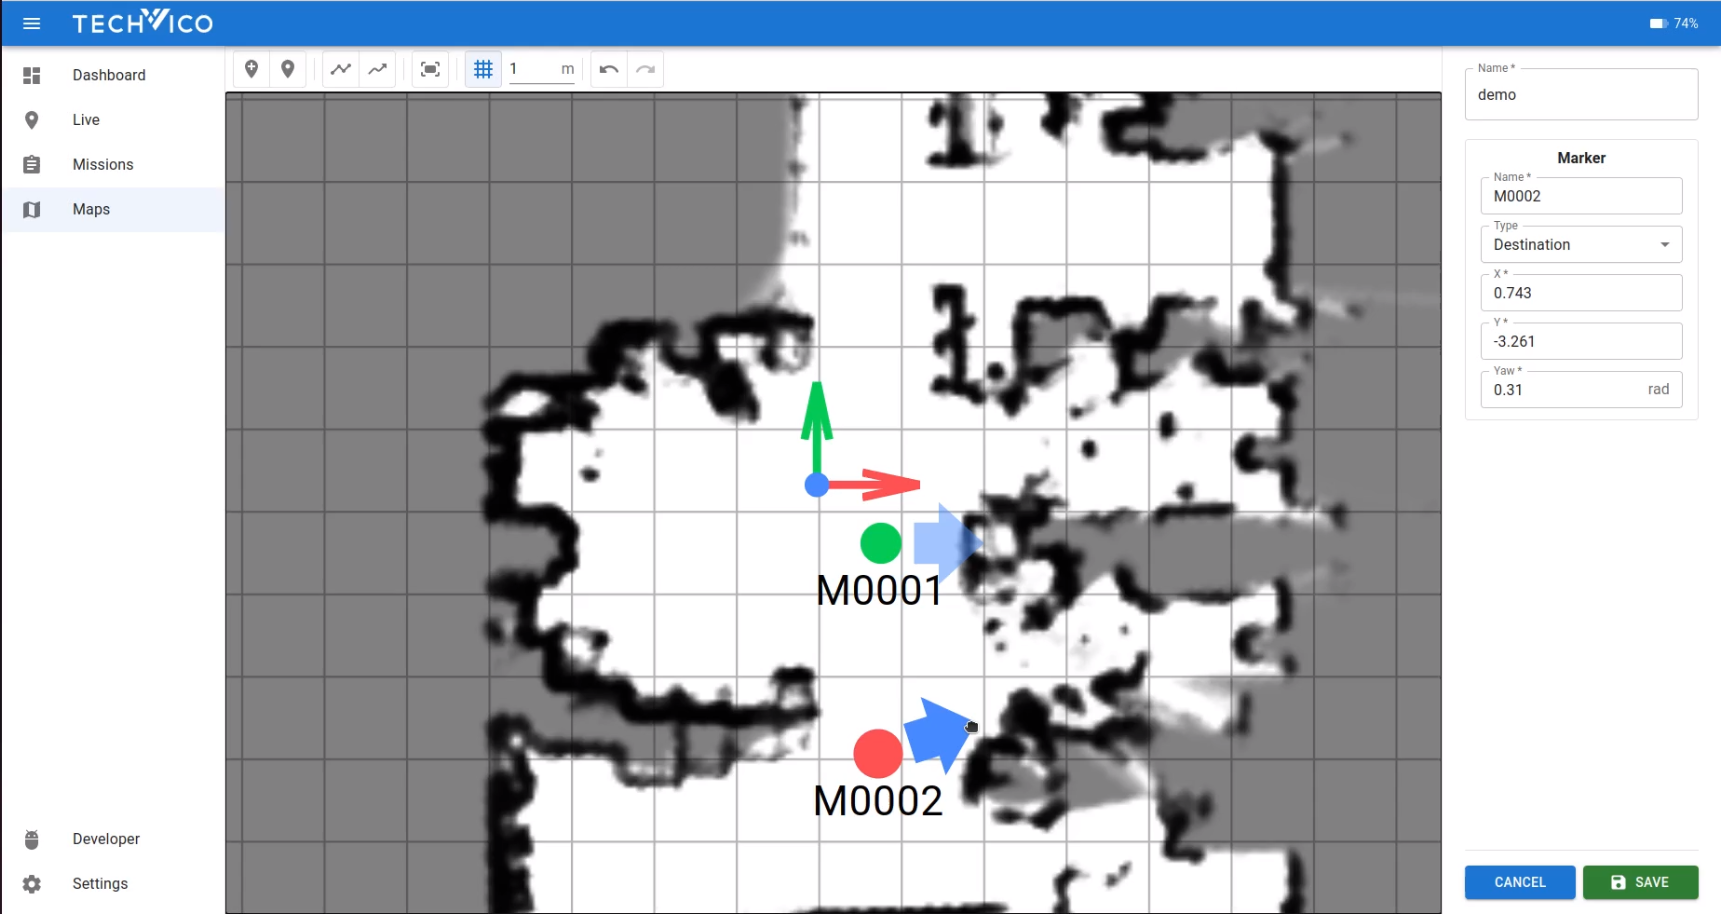
Create a new marker: On the toolbar that lies on top of the Map view, choose the marker type icon button, and use the left mouse button to click on the Map view to create a new marker. There are 2 types of markers:
 Waypoint: only has (x,y) coordinate, represented by the green circle on the Map view
 Destination point: has yaw parameter, represented by the green circle with the blue arrow on the Map view
-
Edit marker parameters:
- Click the marker on the map, all parameters of this marker are shown and can be edited on the left status bar.
- Parameters can be changed:
- Name
- Type: Destination point/ Waypoint
- Coordinate: (x, y, yaw)
- The coordinate of a marker can also be changed by using the left-mouse button to click and drag the green circle (changing the position) and the blue arrow (changing the yaw) directly on the Map view
-
Delete marker: Click a marker and press the Delete button on the keyboard to delete a marker.
Path
-
Create a new path: On the toolbar that lies on top of the Map view, choose the path line icon button, then use the left mouse button to click on two or more consecutive markers to create a path between them. Press Esc on the keyboard to stop creating paths. There are 2 types of paths:
 Straight path: a straight line between 2 markers
 Curve path: drawing a straight line between 2 consecutive markers. This line has 2 control points, and users can click and drag these control points to curve the path.
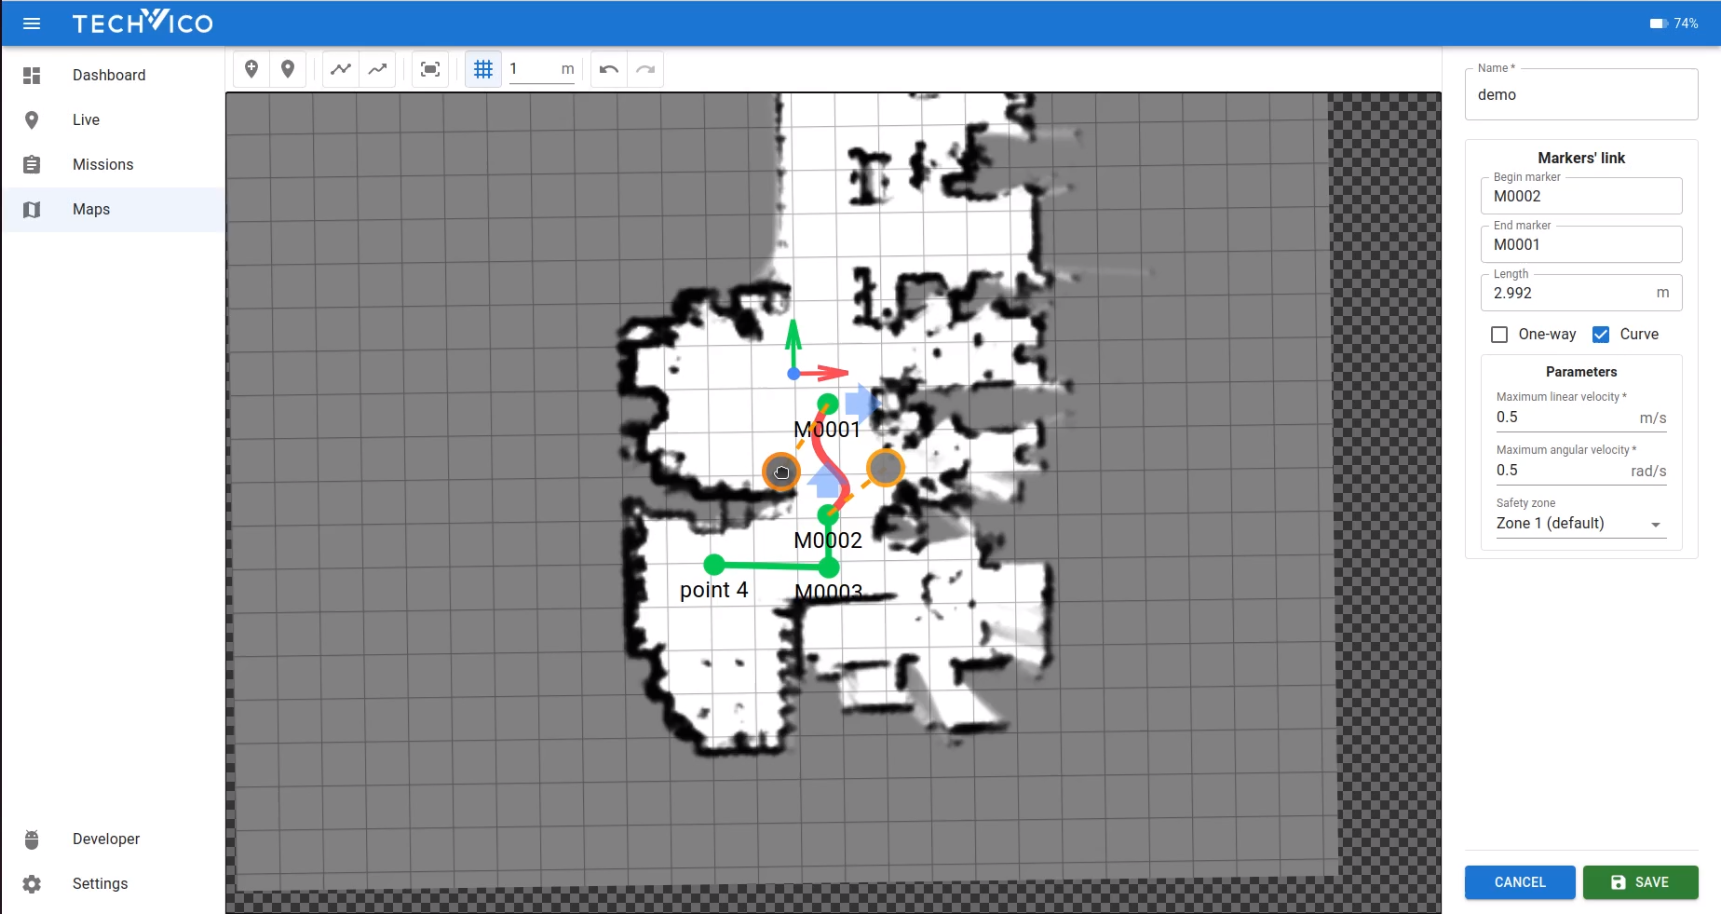
- Edit path parameters:
- Click the marker on the map, all parameters of this marker are shown and can be edited on the left status bar.
- Parameters can be changed:
- Begin and end markers
- Length of the path
- One-way/Bi-directional
- Type: Curve/ Straight line
- Minimum/Maximum linear velocity of the robot when going in this path
- Safety zone: Default is Zone 1
- Delete a path: Click a path and press the Delete button on the keyboard to delete it.
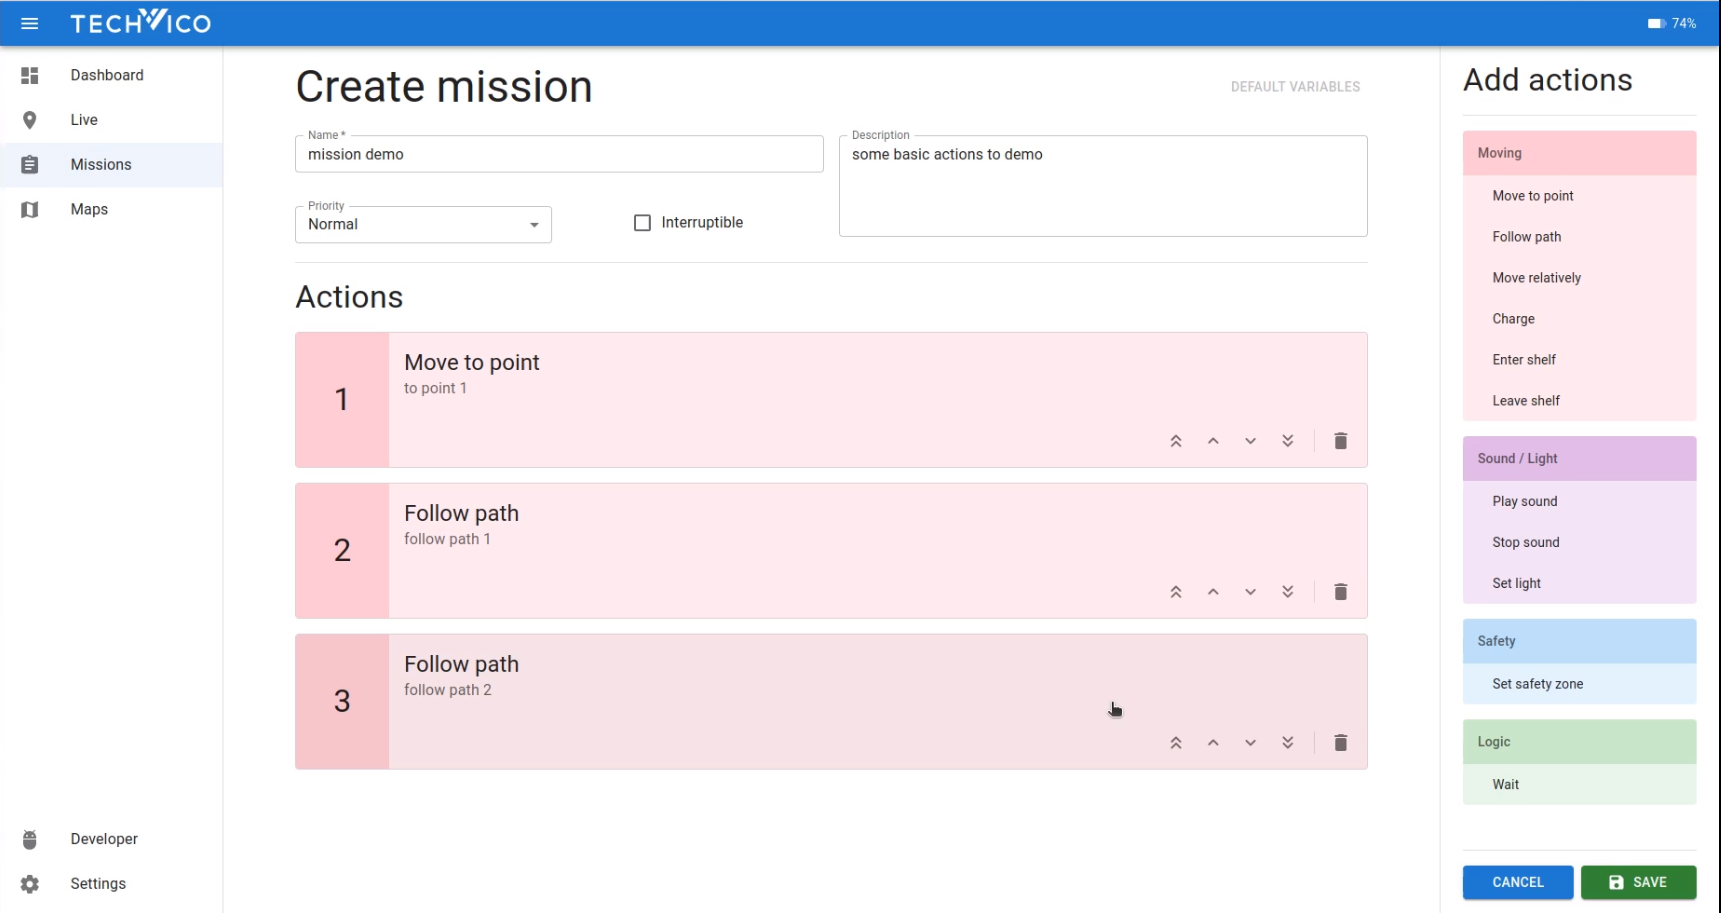
8.6. Creating Missions, Actions and Testing
All missions and actions inside a mission are created on the Missions page.
Mission
On the Missions page, click the NEW button ![]() to create a new mission. The WebApp switches to Create map page to input the parameters for a mission:
to create a new mission. The WebApp switches to Create map page to input the parameters for a mission:
- Name (*required): name of the mission as a unique string
- Description (optional): Some detailed sentences about the mission
- Priority (default: Normal): priority of the mission: Low/Normal/High/Highest
- Interruptible (default: none): the mission can be interrupted or not during execution
- Actions: a list of actions inside the mission
After choosing all parameters for the mission, click the SAVE button at the bottom right corner to save the mission or click the CANCEL button to discard all.
When a new mission is saved, the mission list will be updated on the Missions page. Users can delete a mission by clicking the DELETE button or edit it by clicking the EDIT button.

Action
Users can add one or more actions to a mission when creating a new mission or editing a mission. At the interface of editing parameters of a mission, there is a list of actions on the left bar of the WebApp. Click on the action name to add an action, and a dialog will appear for the users to change the parameters of the action, then click the SAVE button to save the action.
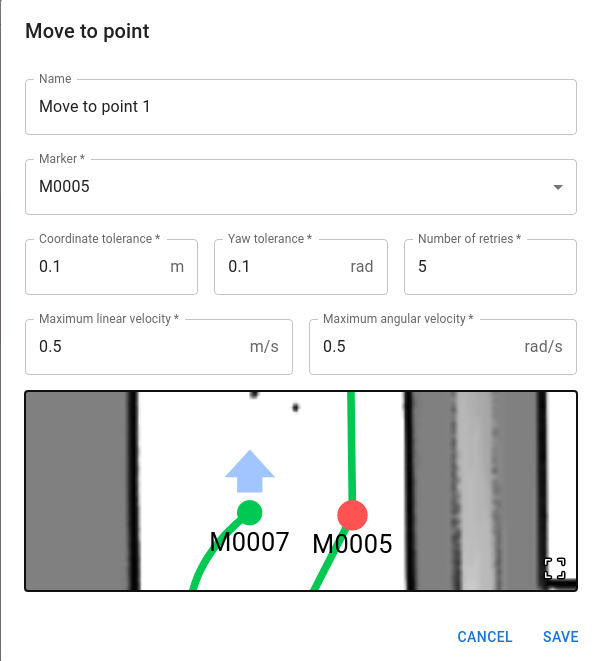
Move to point
- Action to move the AMR to a point (goal/destination).
- Parameters:
- Name (optional): name of the action
- Marker (required): destination marker. Users can choose from the markers drop-down list or click a marker on the map interactive window at the bottom of the dialog (the chosen marker will be highlighted in red).
- Coordinate tolerance/ Yaw tolerance (required): The tolerance of goal in translation and rotation.
- Number of retries (required): default is 5 times
- Maximum linear velocity (required): default is 0.5 m/s
- Maximum angular velocity (required): default is 0.5 rad/s
Follow path
- Action to move the AMR from point A to point B following the path that is drawn between 2 points by the users. A path has to be drawn before creating the follow-path action.
- Parameters:
- Name (optional): name of the action
- Begin marker/ End marker (required): start and end points of the path. These points can be chosen from the markers drop-down list or click a marker on the map interactive window at the bottom of the dialog (the chosen markers and path will be highlighted in red).
- Coordinate tolerance/ Yaw tolerance (required): The tolerance of goal in translation and rotation.
- Number of retries (required): default is 5 times

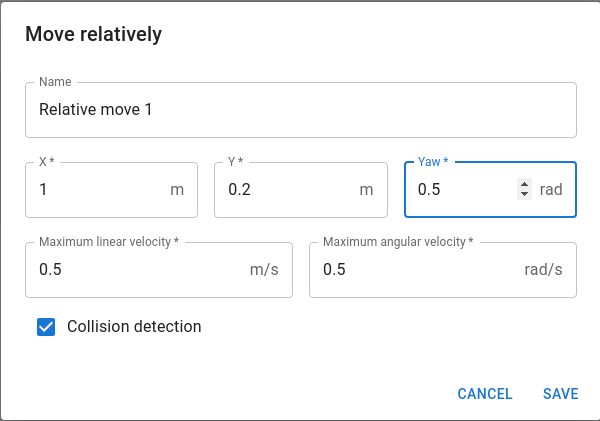
Move relatively
- Action to move the AMR relatively from its previous position.
- Parameters:
- Name (optional): name of the action
- x (required): translation in x coordinate
- y (required): translation in y coordinate
- yaw (required): rotation
- Maximum linear velocity (required): default is 0.5 m/s
- Maximum angular velocity (required): default is 0.5 rad/s
- Collision detection (default: true): Enable collision detection or not
Wait
- Action to wait in a period of time
- Parameters:
- Name (optional): name of the action
- Duration (required): waiting time in seconds

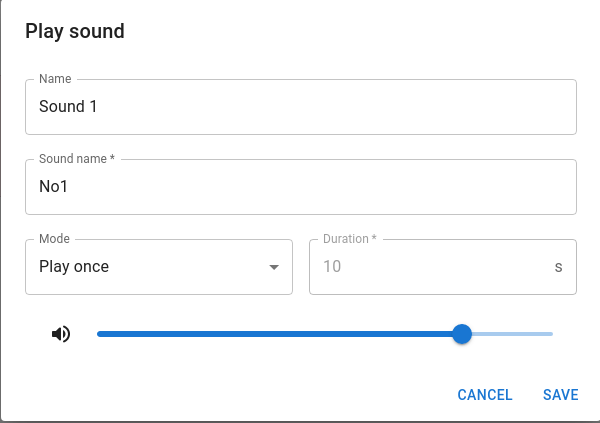
Play sound
- Action to play a sound
- Parameters:
- Name (optional): name of the action
Stop sound
- Action to stop playing a specific sound
- Parameters:
- Name (required): name of the playing sound

Set light
- Action to set the light mode on the AMR
- Parameters:
- Name (optional): name of the action
- Light mode (required): choose the color and blink mode of the light
- Duration (required): time to display the chosen light mode

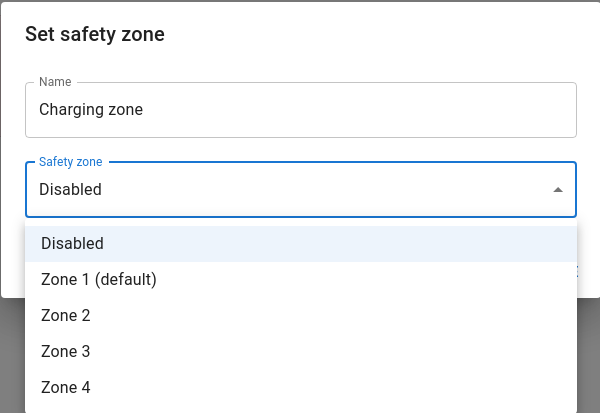
Set safety zone
- Action to set the safety zone for the AMR
- Parameters:
- Name (optional): name of the action
- Safety zone: choose the safety zone for the AMR
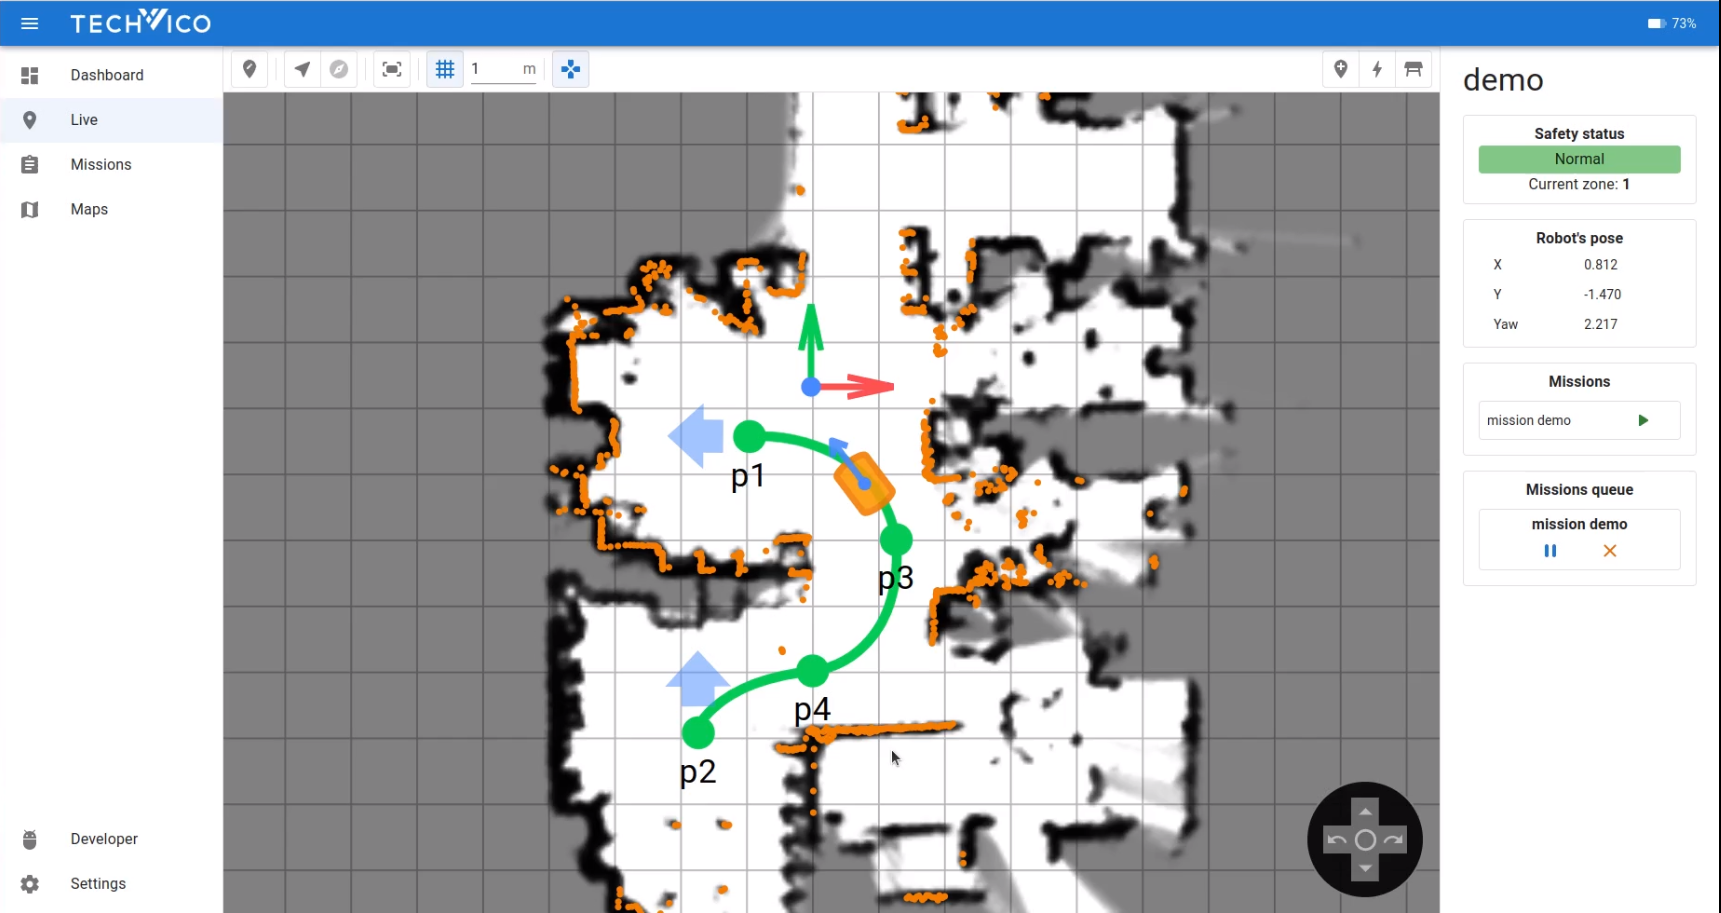
Test A Mission
There are two ways to execute a mission on the WebApp:
- From the Missions page: On the Missions page, click the EXECUTE button on the right side of the wanted mission.
- From the Live page: On the Mission box on the right status bar of the Live page, click the Play button
 on the right side of the wanted mission
 - When one or more missions are executed, a list of executing missions will be shown in the Mission queue box on the right status bar in order.
8.7. Updating Software
Techvico continuously updates the software the robots use, either to fix issues, to improve existing features, or to introduce new features. Each software release is issued with a release note explaining the content of the update and its target audience.
Contact your distributor for the latest recommended update file.
Then user can go to the Settings page on WebApp, switch to the Package manager tab, click the UPLOAD button, and choose the update file to upload the file.
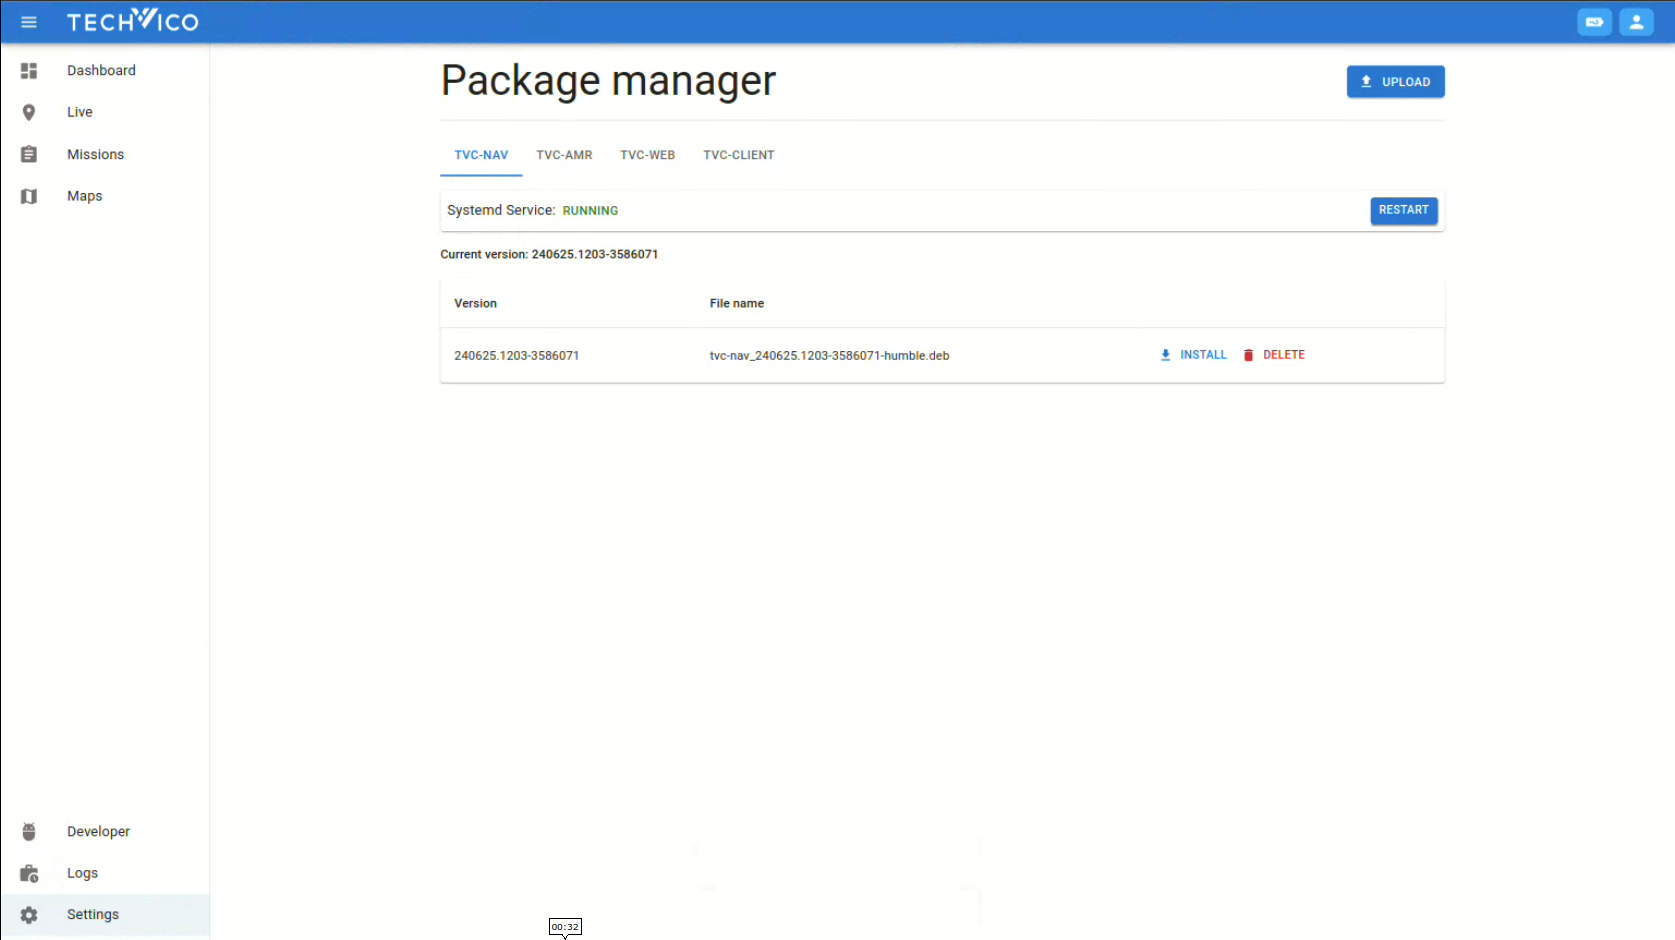
After that, click the INSTALL button next to that file to start the update process and wait until the process is done.
9. Maintenance
The following maintenance schedules give an overview of regular cleaning and parts replacement procedures.
It is the responsibility of the operator to perform all maintenance tasks on the robot.
NOTICE Only use approved spare parts. Contact your distributor for the list of spare parts and the appropriate how-to guides. Techvico disclaims any and all liability if unapproved spare parts are used. Mobile Industrial Robots cannot be held responsible for any damages caused to the robot, accessories, or any other equipment due to the use of unapproved spare parts.
9.1. Regular Checks and Maintenance Tasks
Contact our Technical team for detailed information.
CAUTION If the robot has been impacted, it may be structurally damaged, causing a risk of malfunction and injury to personnel.
- If you suspect the robot has suffered any damage, you need to conduct a thorough inspection to ensure that the robot's strength and structure is not compromised.
9.2. Battery Maintenance
The battery is generally maintenance-free but should be cleaned if it gets very dirty. Before cleaning, the battery must be removed from any power source. Only use a dry and soft cloth to clean the housing of the battery, and do not use abrasives or solvents.
For disposal of the battery, see Battery Disposal Section.
10. Disposal
TVC Basebot robots must be disposed of in accordance with the applicable national laws, regulations, and standards.
For battery disposal, see the Battery Disposal Section.
11. Error Handling
The robot enters an error state when it can't solve a problem on its own.
Errors include:
- Hardware faults
- Failed localization
- Failure to reach the destination
- Unexpected events in the system
An error triggers a Protective stop. The robot is paused until a user acknowledges the error and clears it.
11.1. Software Errors
Software errors such as localization and failure to reach the goal destination can be prevented with the proper setup of maps and missions:
- Always test your missions under full observation and normal work environment conditions before leaving the robot to execute the missions autonomously.
- Remove noise from maps—see Creating and Configuring Maps Section.
To clear an error, select the red warning indicator in the interface, and select Reset.
For more details on setting up missions and error handling, see the TVC NAV User Manual on the Techvico website.
11.2. Hardware Errors
If the error is a fault in the hardware, either you will not be able to clear it, or the error will return until the fault is fixed. If this occurs, you can try to fix the issue with these actions:
- Turn your robot off and then on again. This resets the robot components and may resolve the issue.
- Check that the Emergency stop button is released.
- Check your robot for any physical damage such as cracks, dents, or severe scratches or contamination such as dust, dirt, and grease. Pay special attention to the 3D cameras, safety laser scanners, and drive wheels.
For further troubleshooting, contact your distributor for specific troubleshooting guides or assistance from Techvico Technical Support.
12. Warranty
Techvico Co. Ltd. offers a standard warranty on all products. Contact your distributor to see the terms and extend of product coverage.
NOTICE Techvico disclaims any and all liability if TVC Basebot or its accessories are damaged, changed, or modified in any way. Techvico cannot be held responsible for any damages caused to TVC Basebot, accessories, or any other equipment due to programming errors or malfunctioning of TVC Basebot.
Contact Us
Techvico is committed to helping you achieve rapid success in the robotics field through this User Manual. If you have any comments or technical questions about the improvement of this manual, please leave a message on our official website www.techvico.com, or send us an email to sales@techvico.com to give feedback.
If you need to contact the salesperson for information about TVC Basebot and other Techvico products, please visit our website for sales contact information.
Thank you for your patience and support!